Haine - Fashion and Clothing Shop WooCommerce Theme.
Documentation
- Developed By: MhrTheme
- Version: 2.1
Thank you for purchasing our theme.
If you have any questions that are beyond the scope of this help file, please feel free to contact us.
Getting Started
Haine WPTheme is excellent for fashion and clothing shop websites. Flat colors, clean, modern design and completely easy to use with customizing, so friendly, and fully responsive. Haine is designed with fashion and clothing in mind, but it can be used by anyone who wants to create an eCommerce and professional site for selling their products.
With the “one click demo” installer it was remarkably easy to start building our test website.
Please advise us of your feedback, so as we may include them in future updates.
Thank you for your business and support.
Installation
To install the Haine theme. You need the latest version of WordPress. Here is the download URL.
Once you downloaded and set it up, you are ready to go. You can install this theme in two ways:
1. Automatic Installation (Recommended)
Step 1. Download ZIP package from marketplace and unzip it.
Step 2. In unzipped folder you will find a folder named "Haine_WPTheme" and 2 archives: "haine.zip" and "haine-child.zip" file.
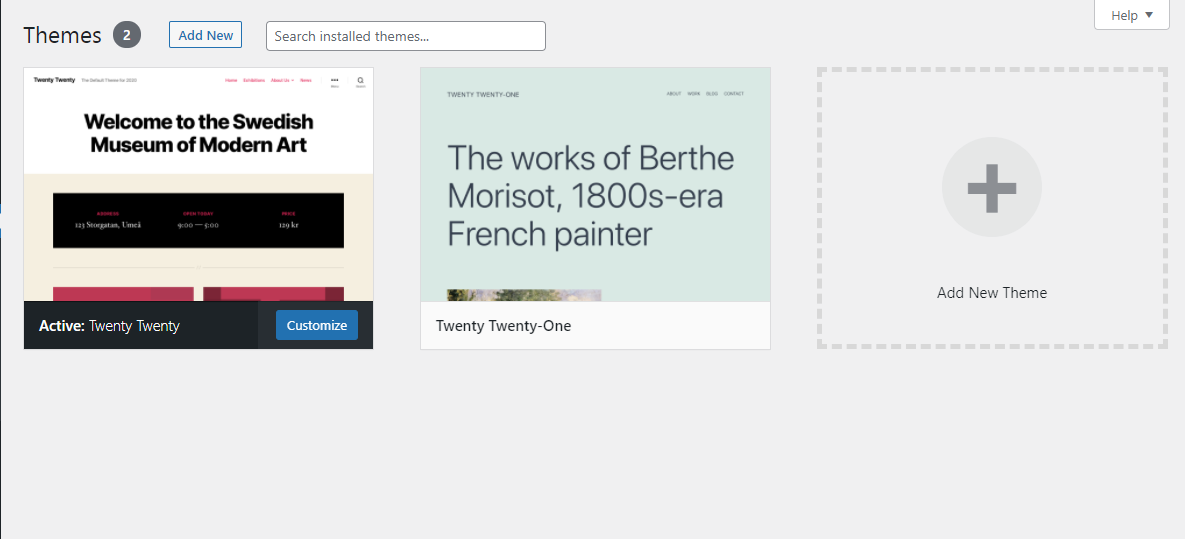
Step 3. In your WordPress Dashboard navigate to Appearance > Themes.
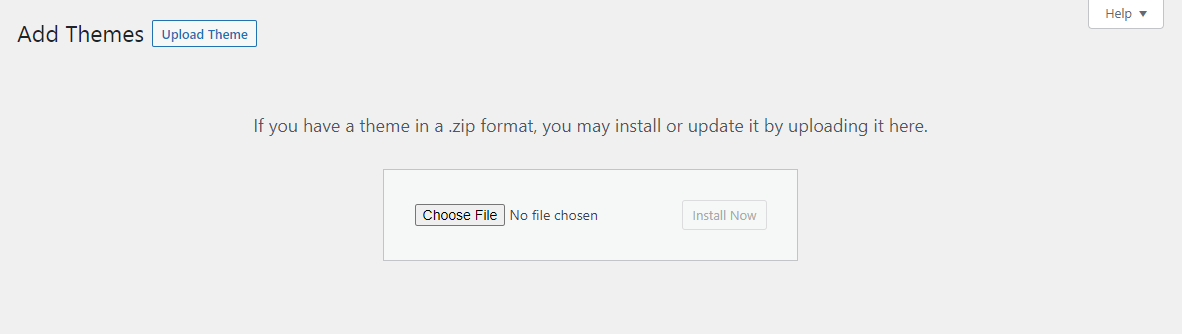
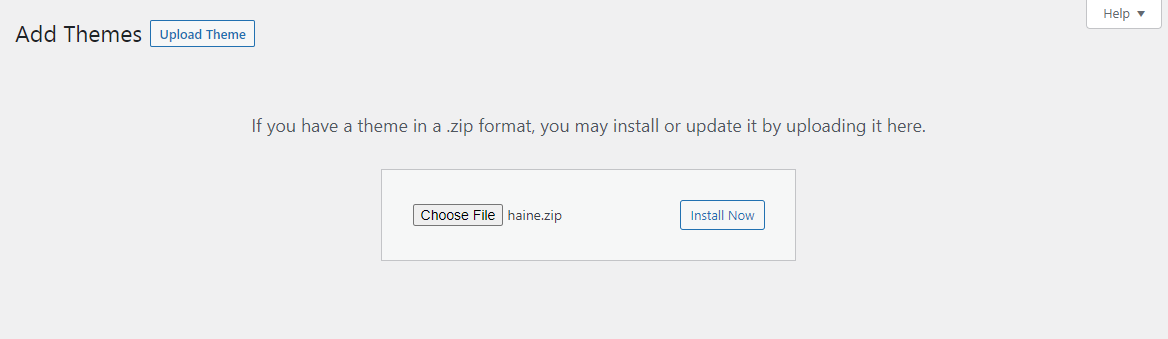
Step 4. Click on Add New, then clicking on Upload Theme and browse the haine.zip file, finally click Install Now.
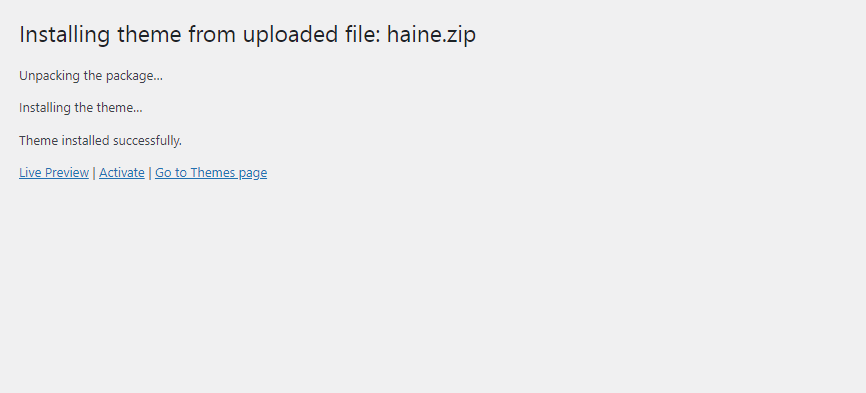
Step 5. Wait a while untill the screenshot below appears, on this form clicking on Activate link to active Haine Theme. The theme has been installed and activated.
N.B: You can use our haine-child theme by follow same procedure as like parent theme.
2. Manual Installation.
Step 1. Download ZIP package file from marketplace and unzip it.
Step 2. In unzipped folder you will find a folder named "Haine_WPTheme" and archive in it: "haine.zip and haine-child.zip" file. Unzip "haine.zip" one more time.
Step 3. Simply upload the unzipped "haine" folder to /wp-content/themes/ folder on your server via FTP.
Step 4. Login to your Dashboard, go to Appearance/Themes menu and activate the theme
N.B: You can use our haine-child theme by follow same procedure as like haine parent theme.
3. Install Needed Plugins:
Haine theme required and recommended the following plugins:
- Elementor Website Builder
- Redux Framework
- Haine Extension
- Contact Form 7
- Mailchimp for WordPress
- Unyson
- WoCommerce
- GTranslate
# After install the haine theme you will be noticed to install required plugins, just follow the instruction you will get all set.
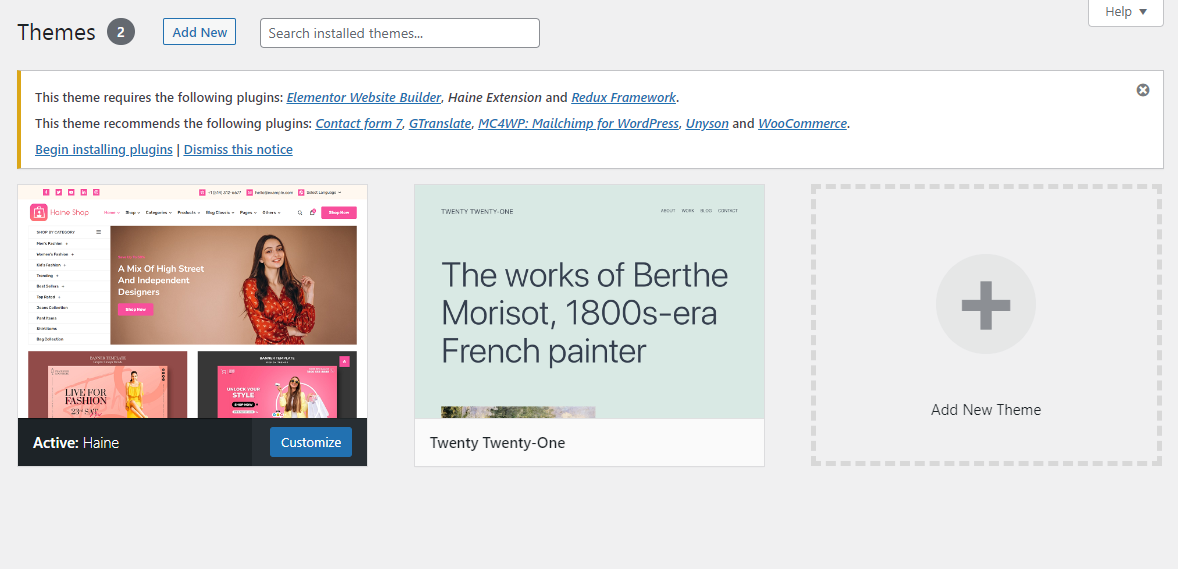
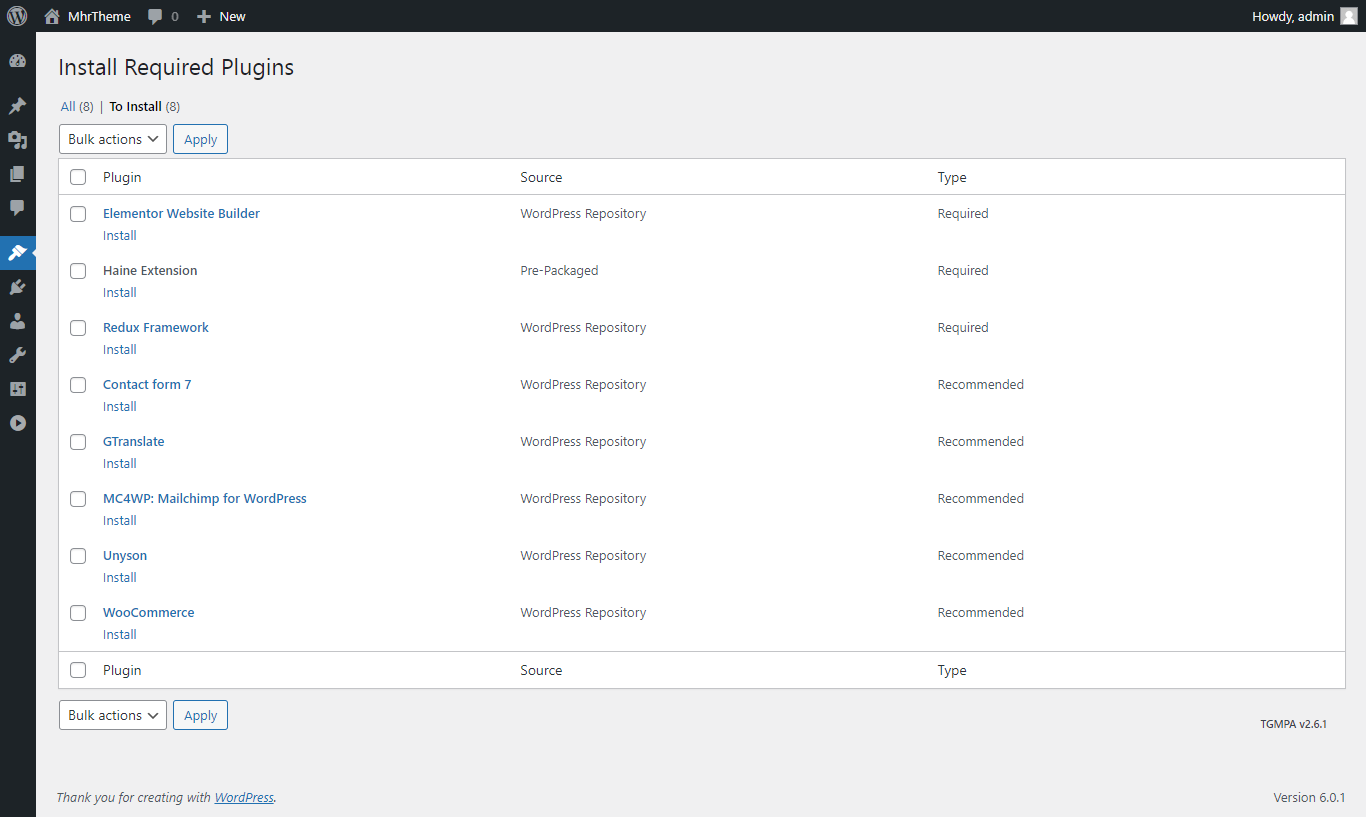
# Then just click on the Begin installing plugins links, after doing this you will go to the next page to install all plugins.
# The installation process may take a while on some hosts, so please be patient. All installations have been completed.
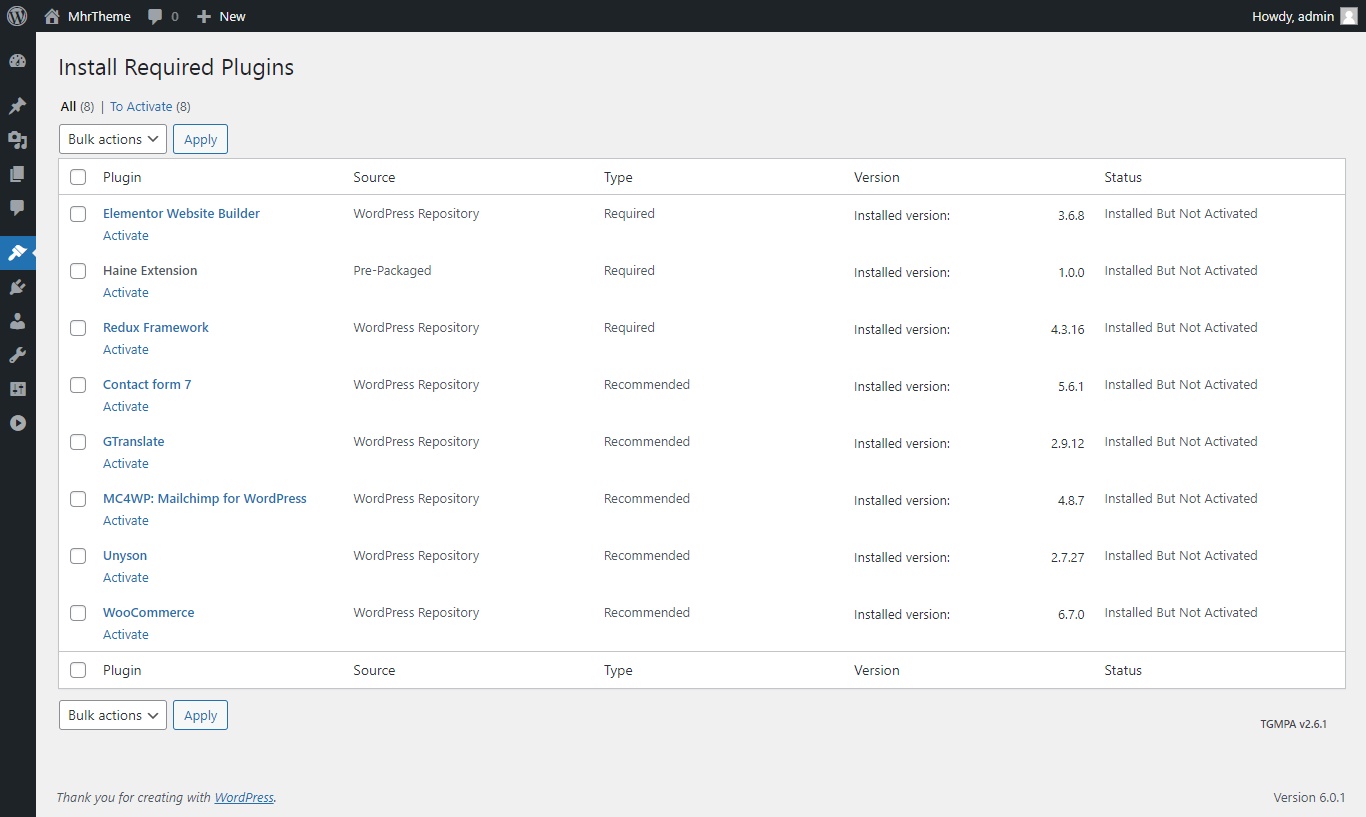
Scrolling down and click on the link "Return to Required Plugins Installer" to activate those installed plugins.
Return to the Dashboard after all plugins have been activated.
All needed installation have done. Follow next steps if you want to install sample data like our demo website.
4. Importing Sample Data.
If you're using the theme to build a new website which doesn't have content yet, I strongly recommend you to use the demo content files. The content is the same as in the Live Demo Preview.
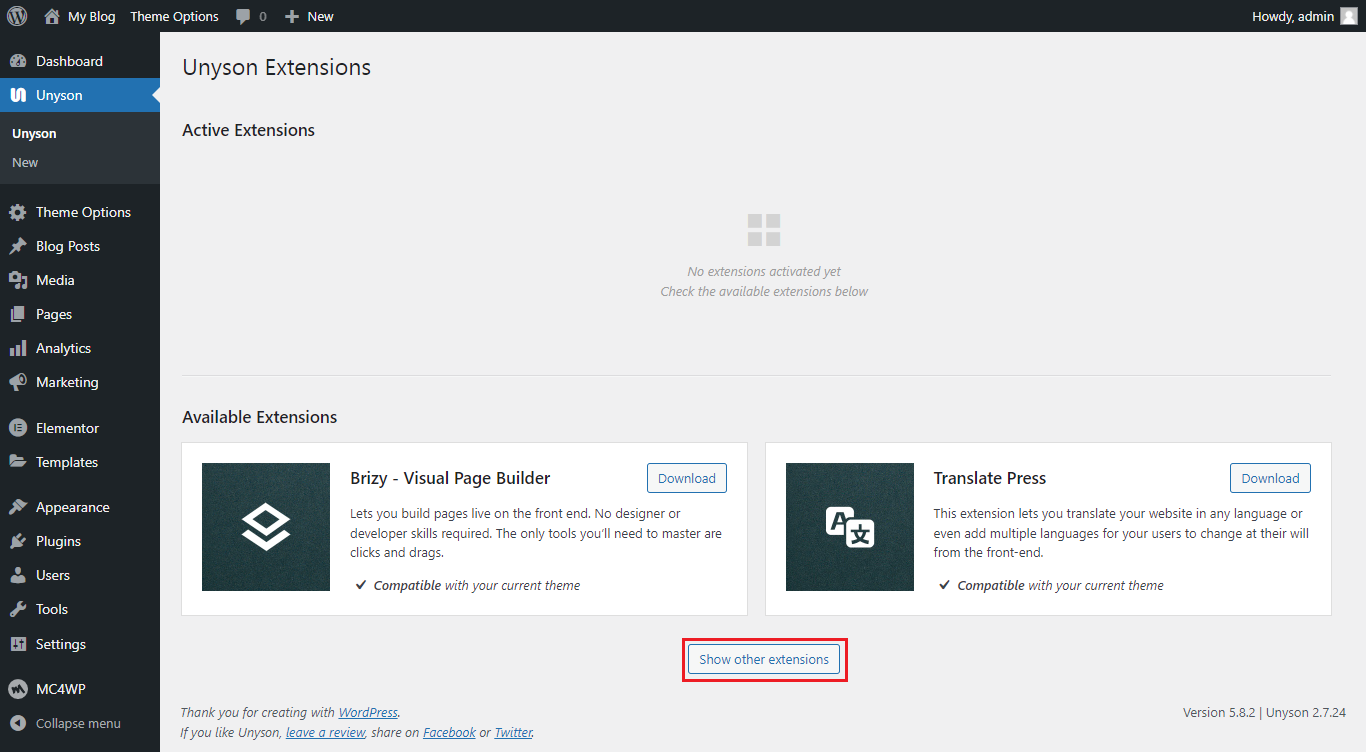
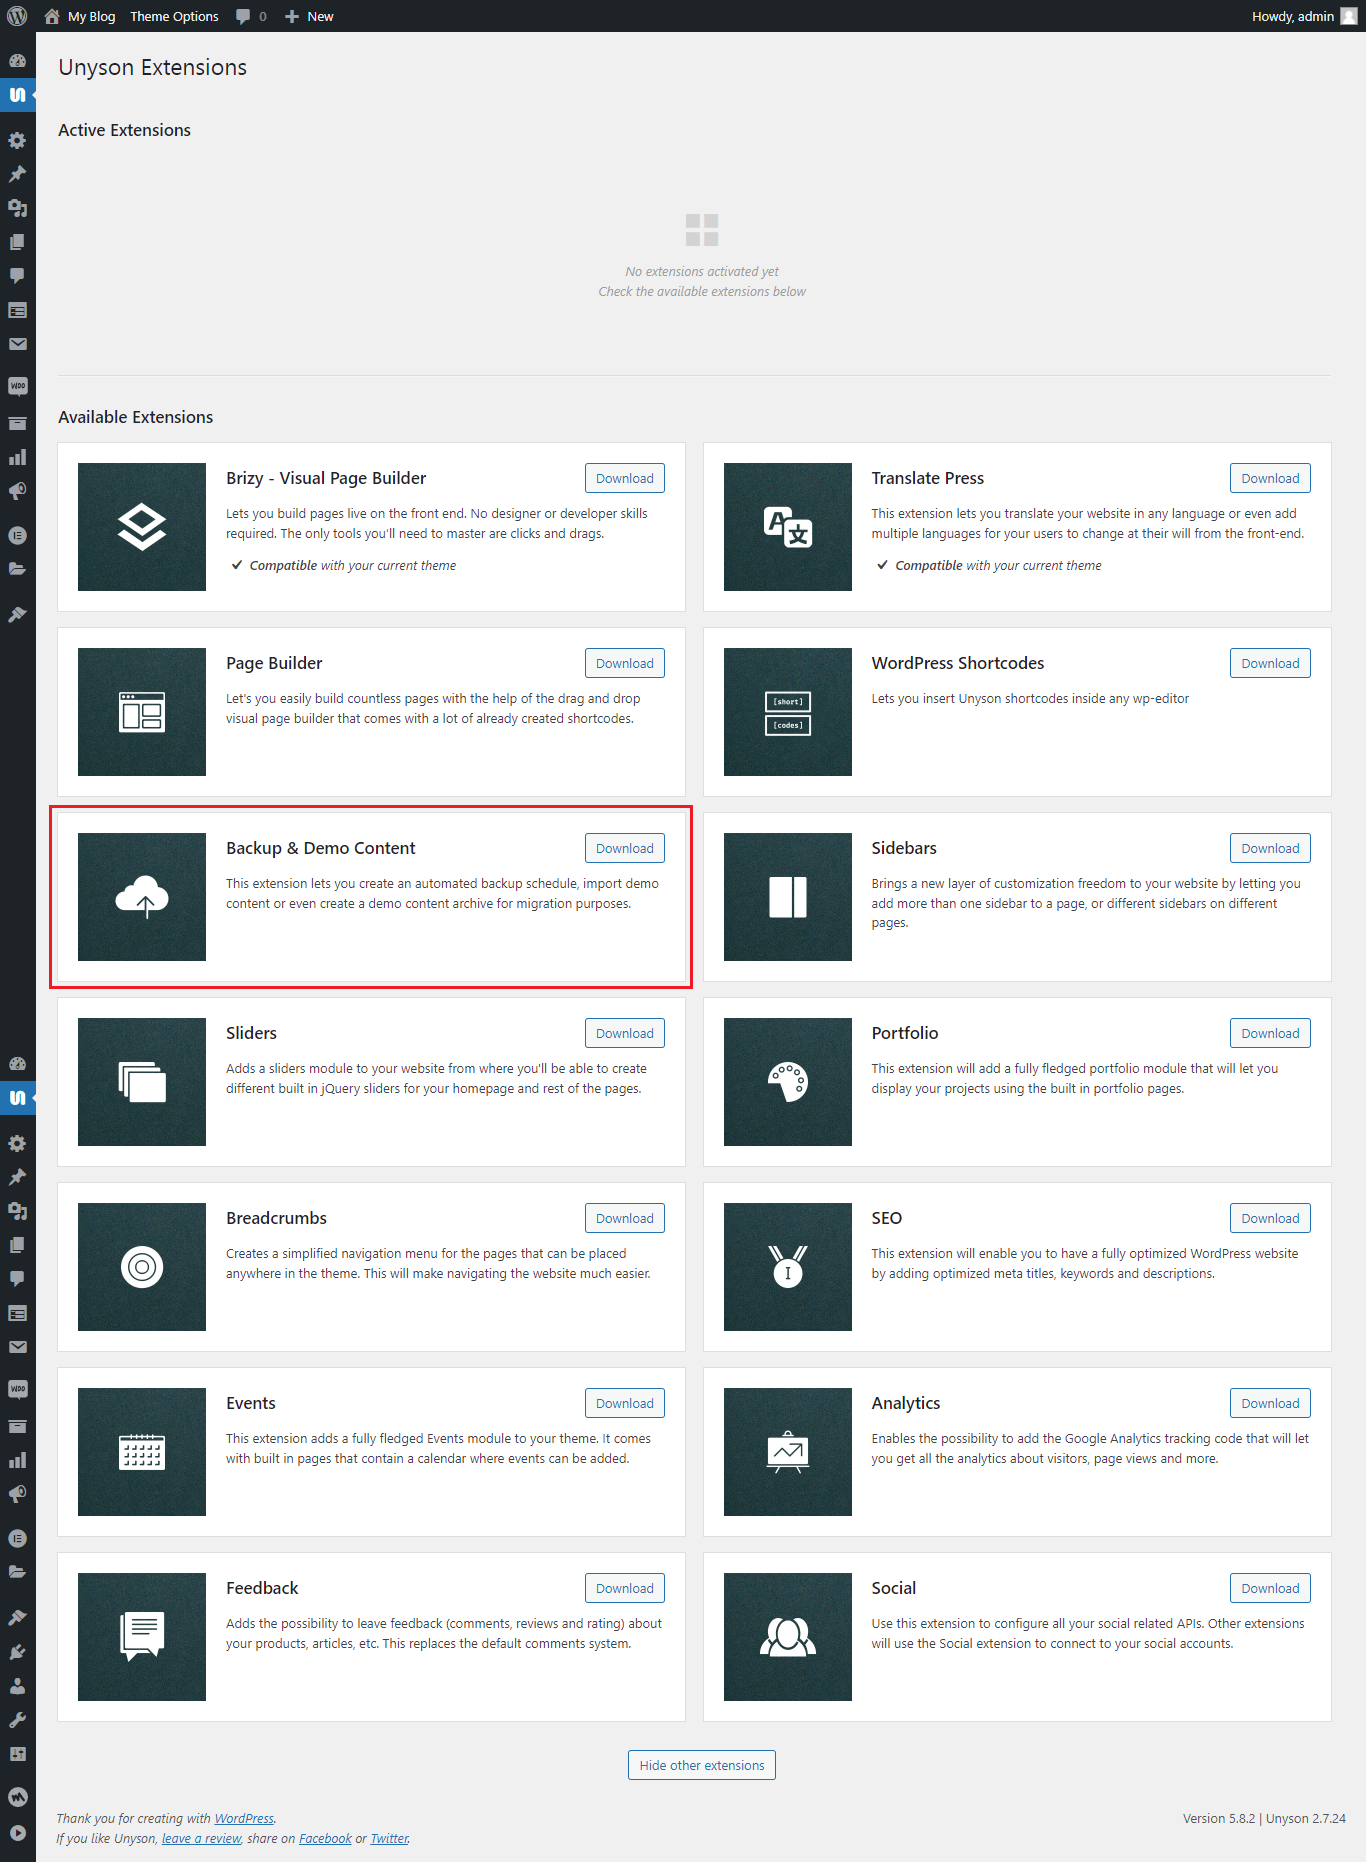
# Navigate to the Dashboard > Unyson and there you will see the Available Extensions for download.
# Then click on “Show other extensions” button, so that you will show more Extensions as shown below.
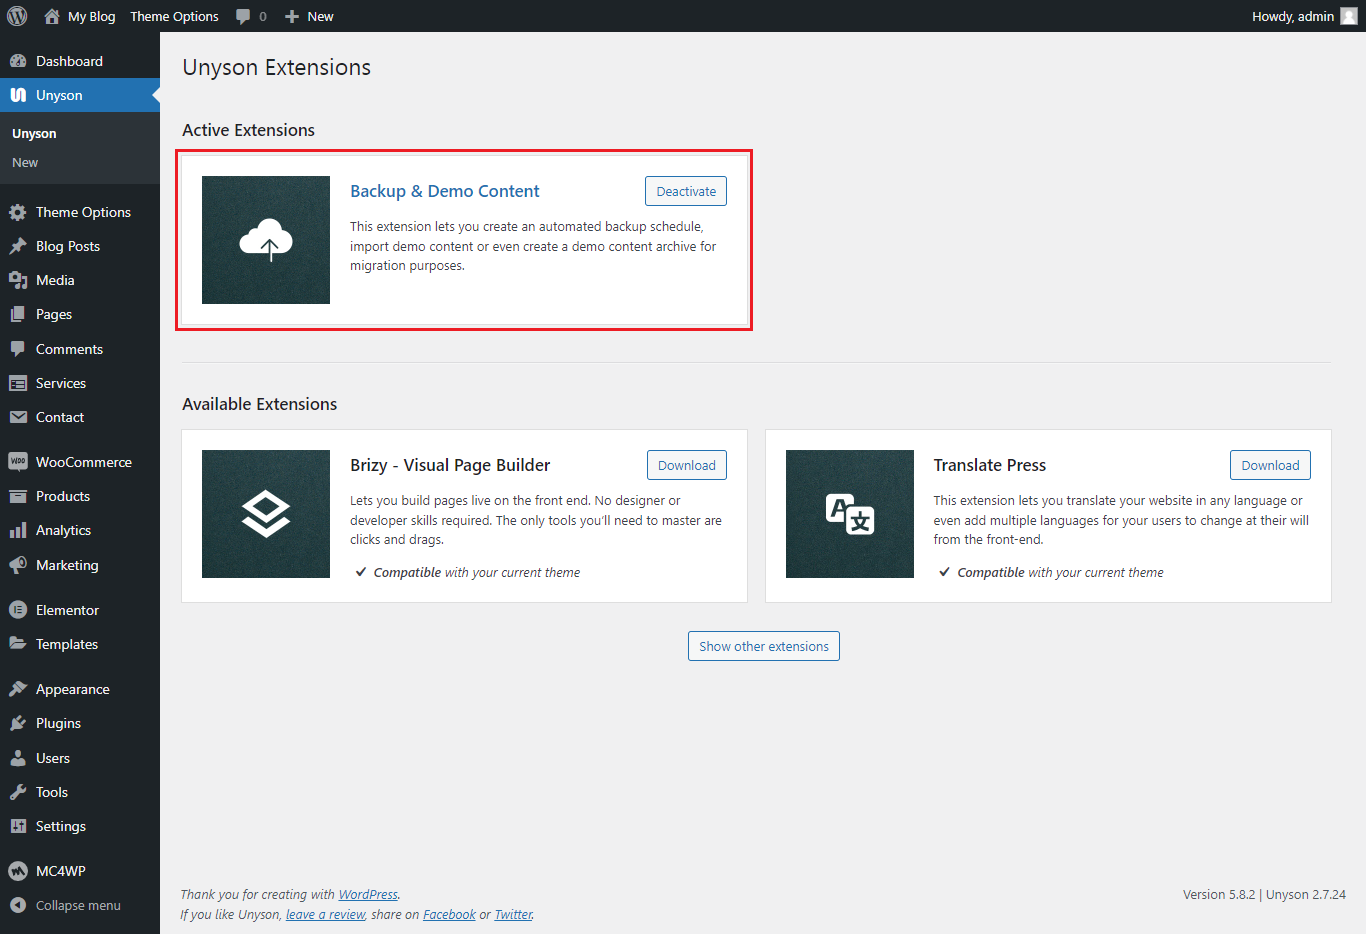
# Now click “Backup & Demo Content” download button, so that it will be added to the Active Extensions as shown below.
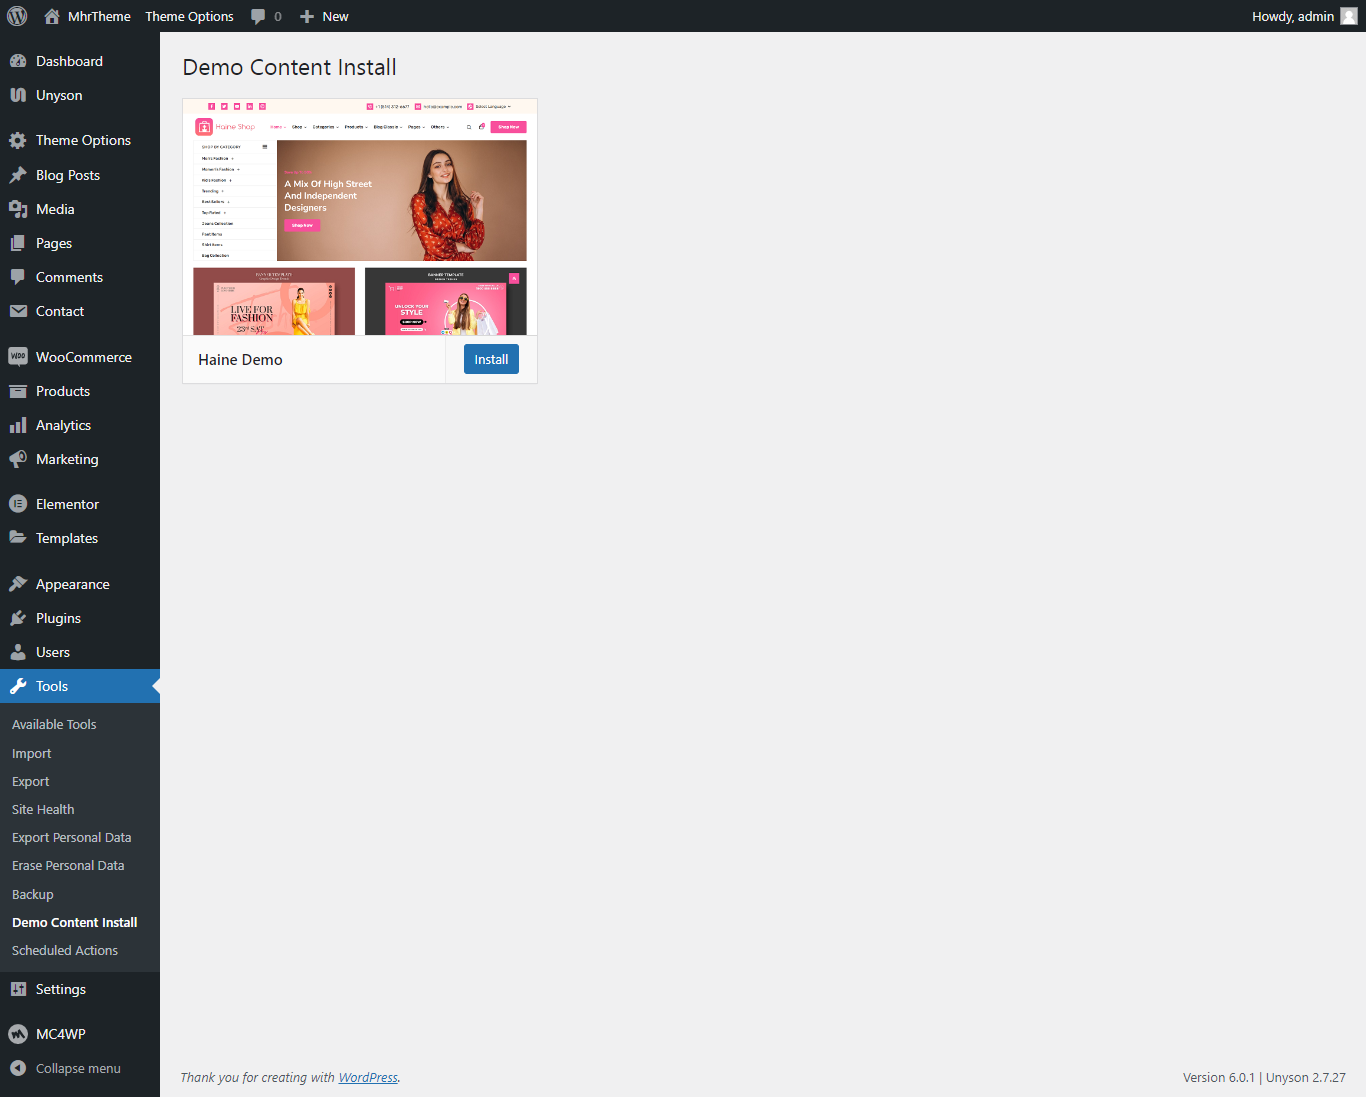
# After doing this, Navigate to the Tools > Demo Content Install, you will find the option to install the Demo Content.
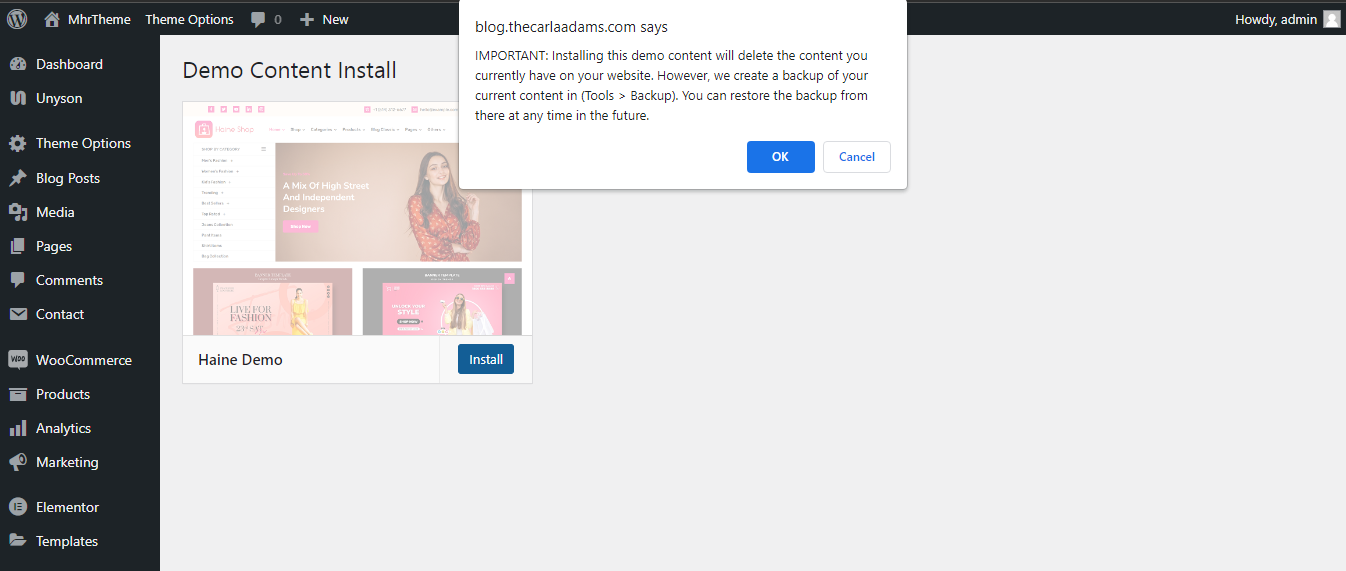
# Then Just click the Install button and you will get a popup notice, click on the OK button.
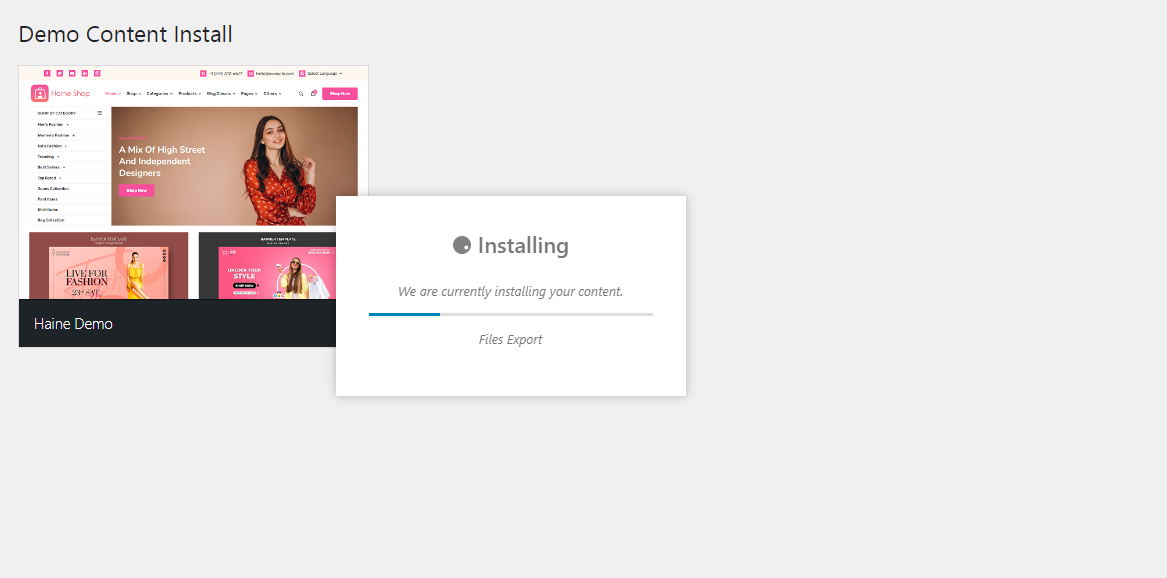
# Next, your sample data will be start import like this.
# Please be patient, as it may take a few minutes to import everything. After completing the process, it will redirect you to your main website.
All done! Have Fun -> Import Sample Data is Success!
Haine Theme Elements
The haine theme has many custom elements that support you in creating visual template pages.
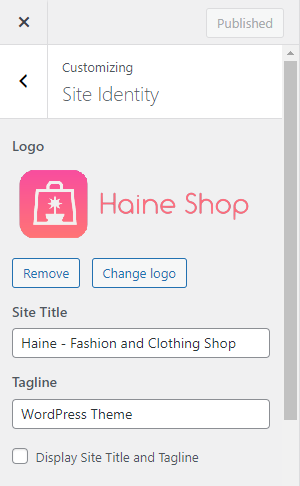
1. Logo, Site Title & Tagline
Logo, Site Title & Tagline options are located in Dashboard - Appearance - Customize - Site Identity.
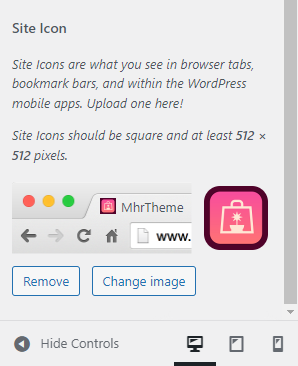
2. Favicon
Favicon options are in the same location as a like site title & tagline.
3. Menus
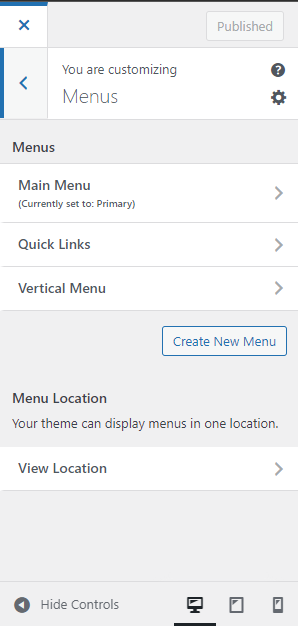
You can add a menu from Dashboard - Appearance - Menus.
The haine theme has one custom menu location that supports creating an element on the header, one menu for the sidebar & one menu for the footer. Sidebar menu can be declared from elementor slider widget and Footer menu can be declared from Appearance - Widgets.
- Primary Location for Header Menu
- Vertical Menu for Sidebar
- Quick Links Menu for Footer
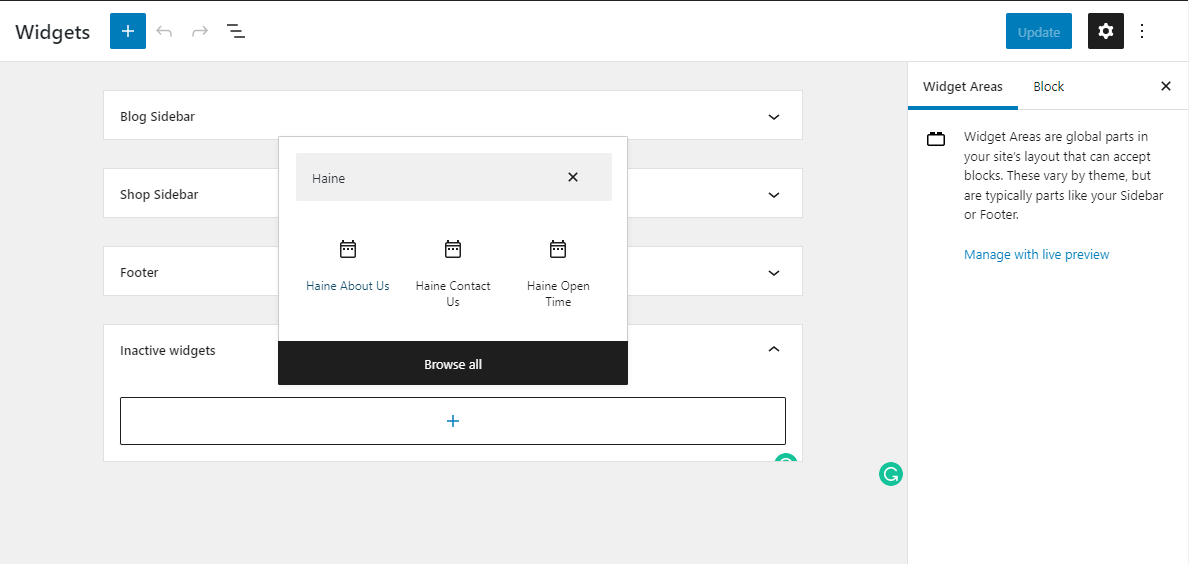
4. Widgets
You can add widgets from Dashboard - Appearance - Widgets.
The haine theme has three custom widgets that support creating elements on the sidebar & footer.
- Haine About Us
- Haine Contact Us
- Haine Open Time
5. Contact Form 7
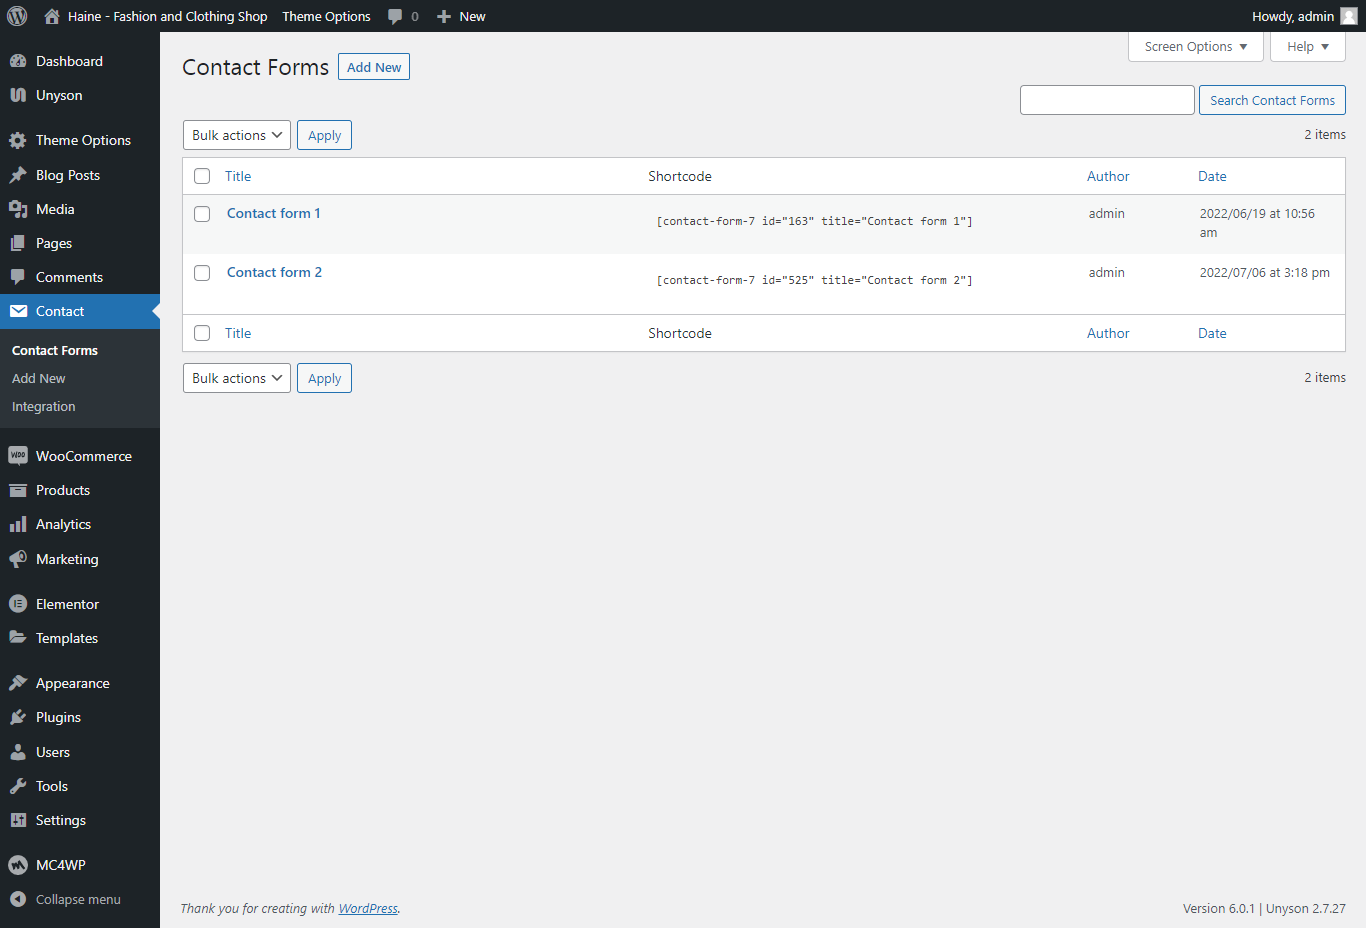
The haine theme has a contact form 7 plugin where you can add contact form shortcode for display on any page, post, or in widgets.
There are two contact forms:
- Contact form 1 for style one
- Contact form 2 for style two
6. Mailchimp for WordPress
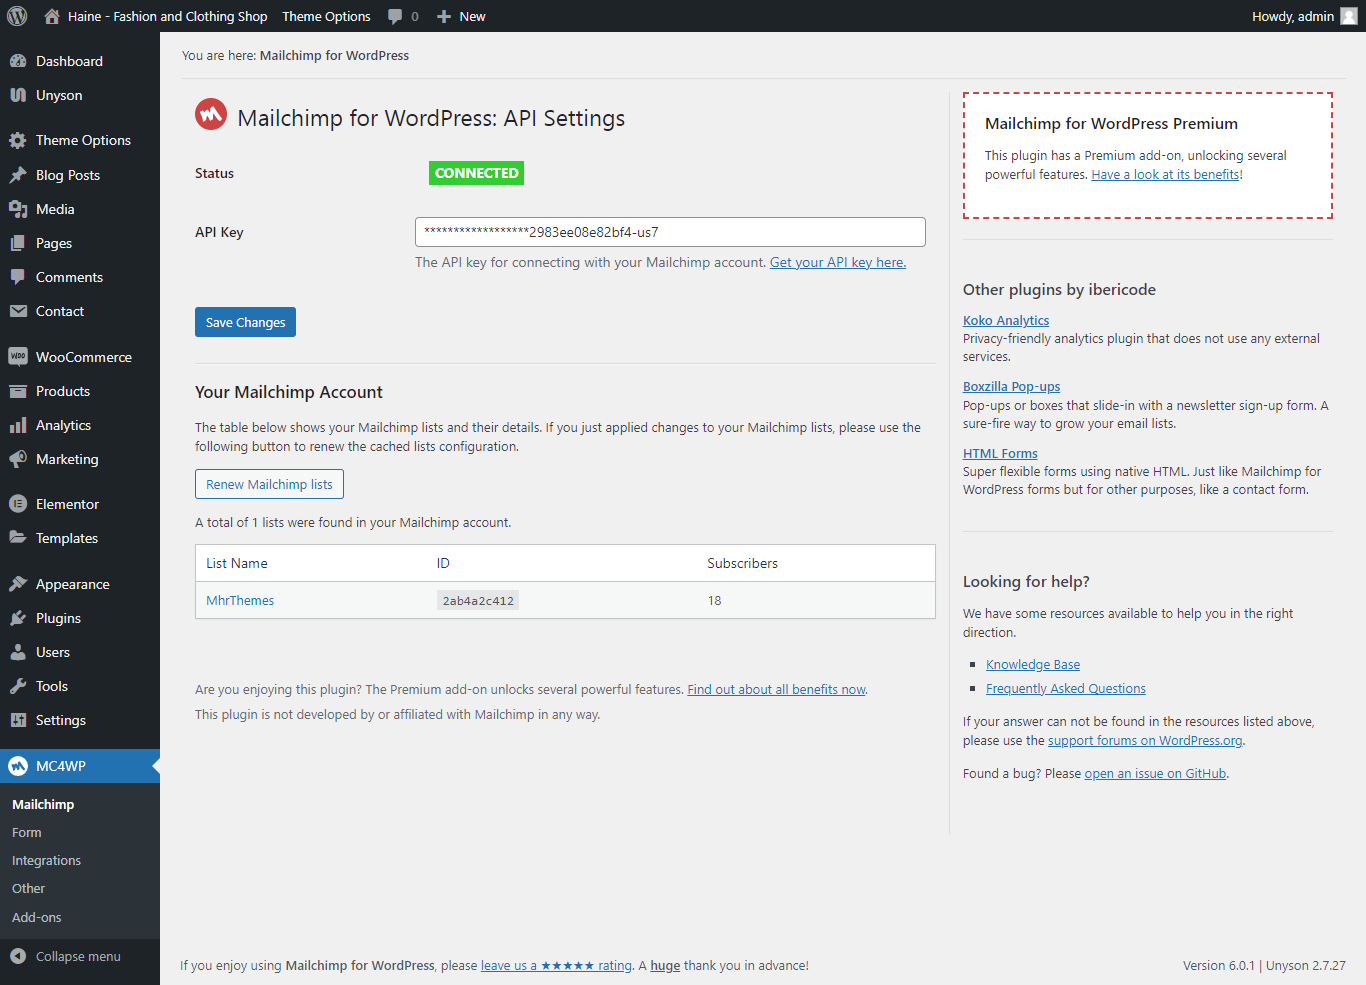
The haine theme has a Mailchimp for WordPress plugin where you can add mailchimp form shortcode for display on any page, post, or in widgets.
There are only one mailchimp form:
- Subscribe for Footer Newsletter
7. Translate WordPress with GTranslate
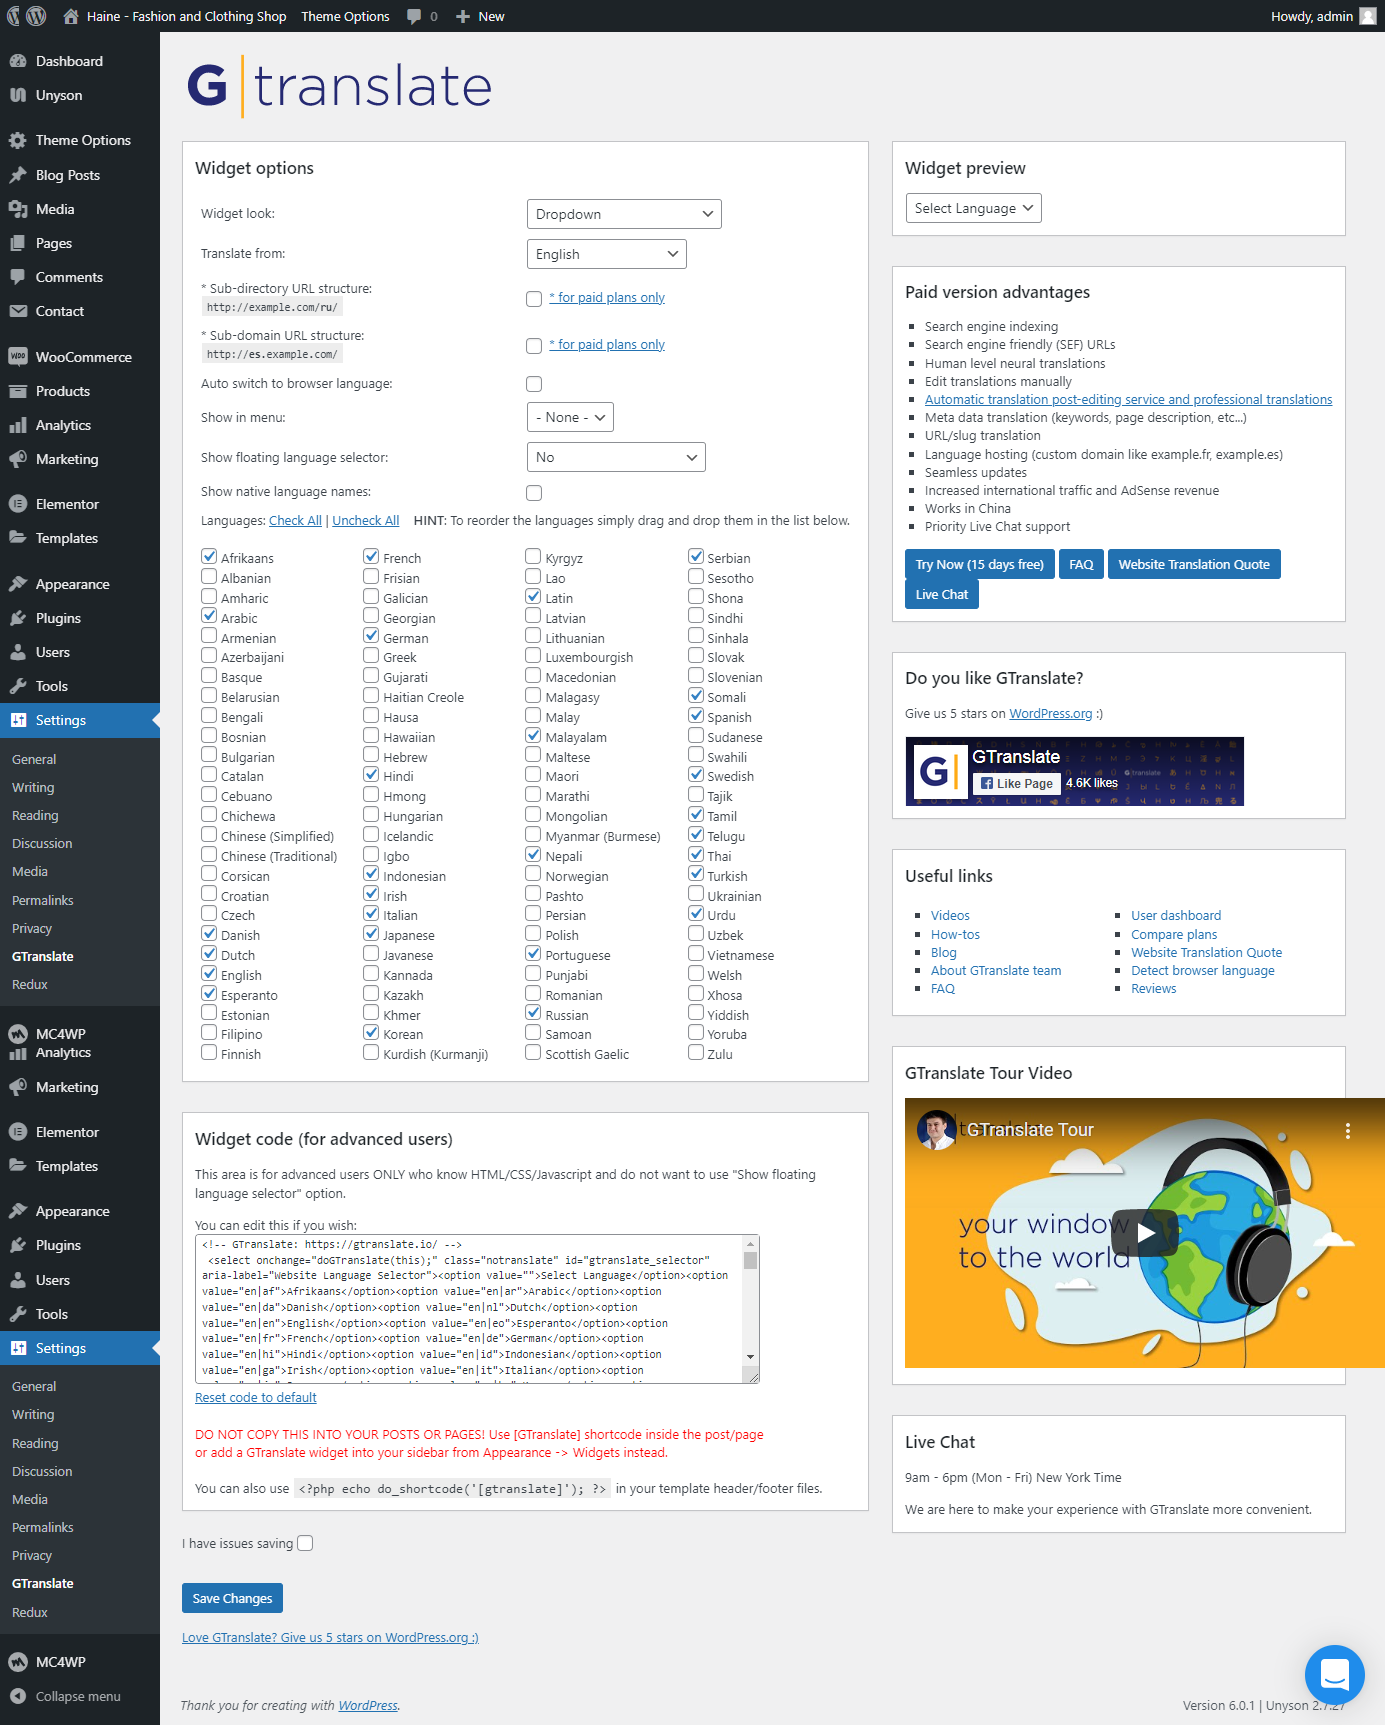
Translate WordPress with GTranslate plugin uses Google Translate automatic translation service to translate wordpress site with Google power and make it multilingual.
There is only one option on the header right side. You can use any of your sites by using shortcode [gtranslate].
Theme Options
Theme Options are used to set general attributes for your website.
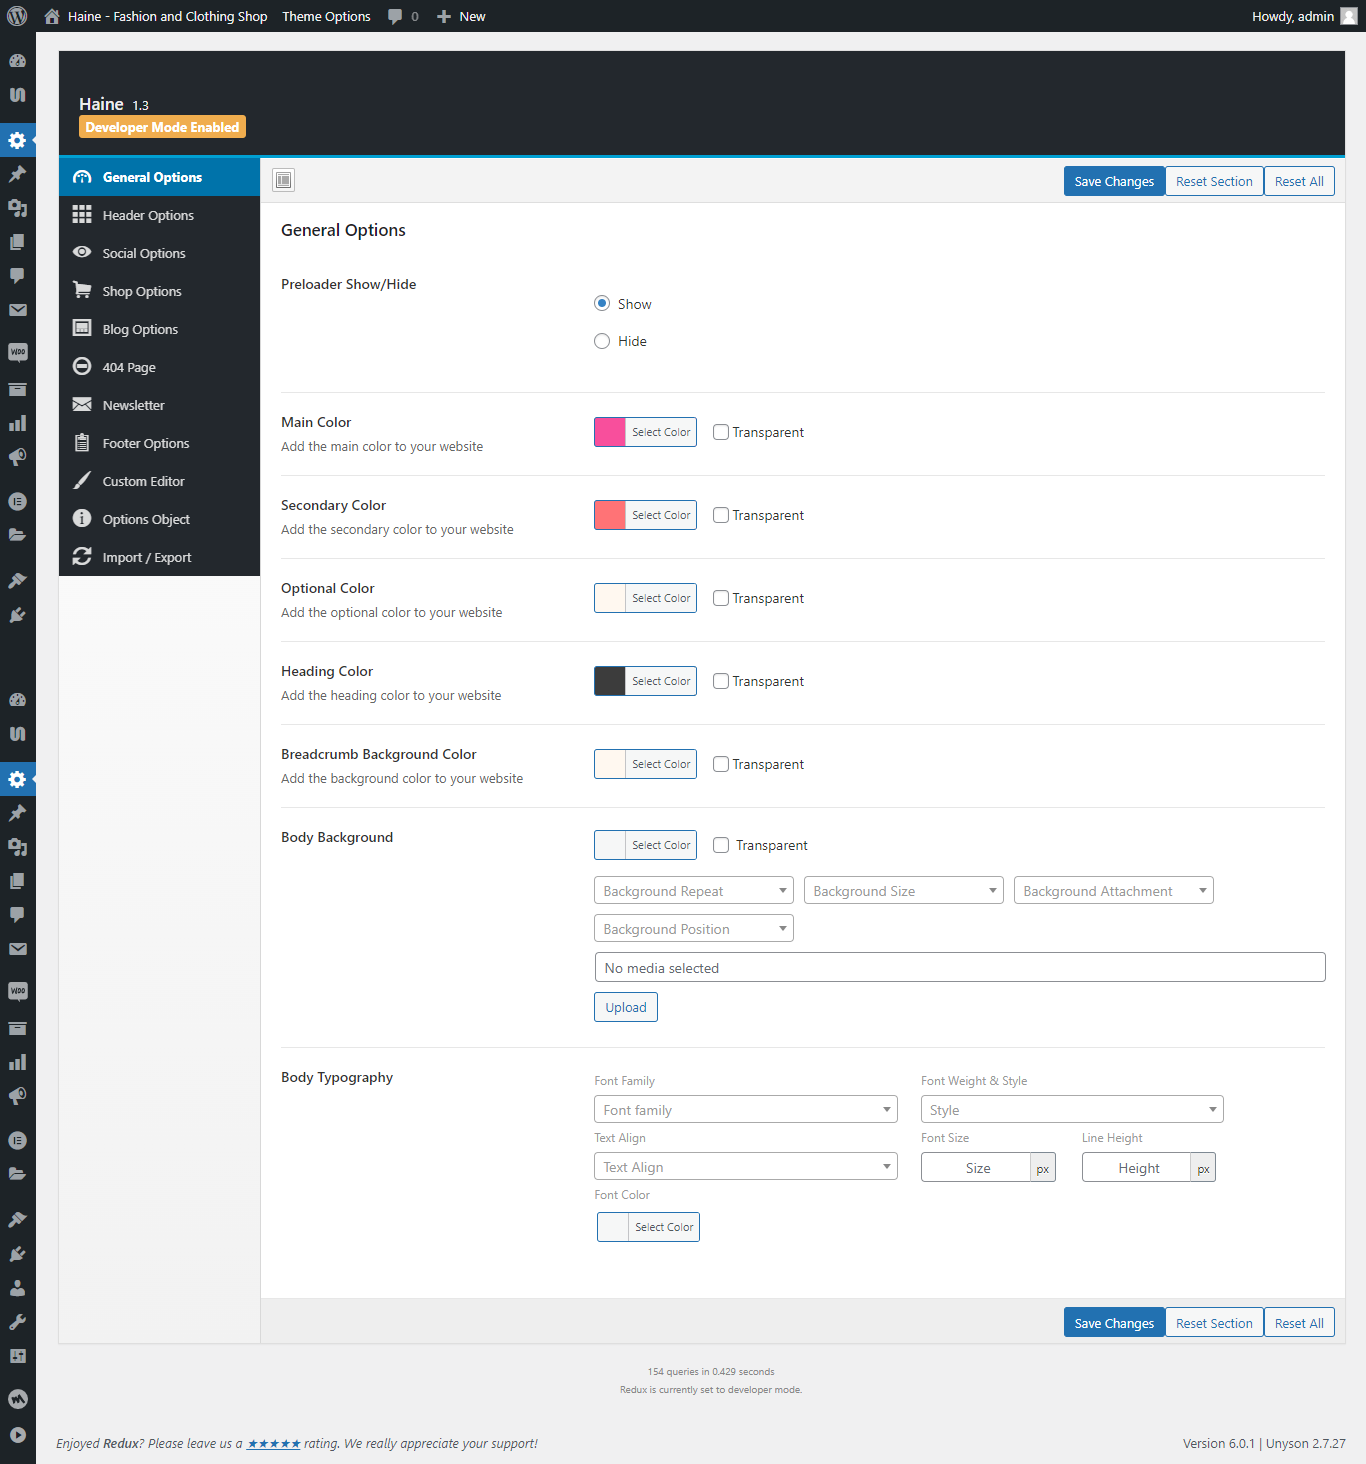
# General Options:
1. Preloader Show/Hide
2. Main Color
3. Secondary Color
4. Optional Color
5. Heading Color
6. Breadcrumb Background Color
7. Body Background
8. Body Typography
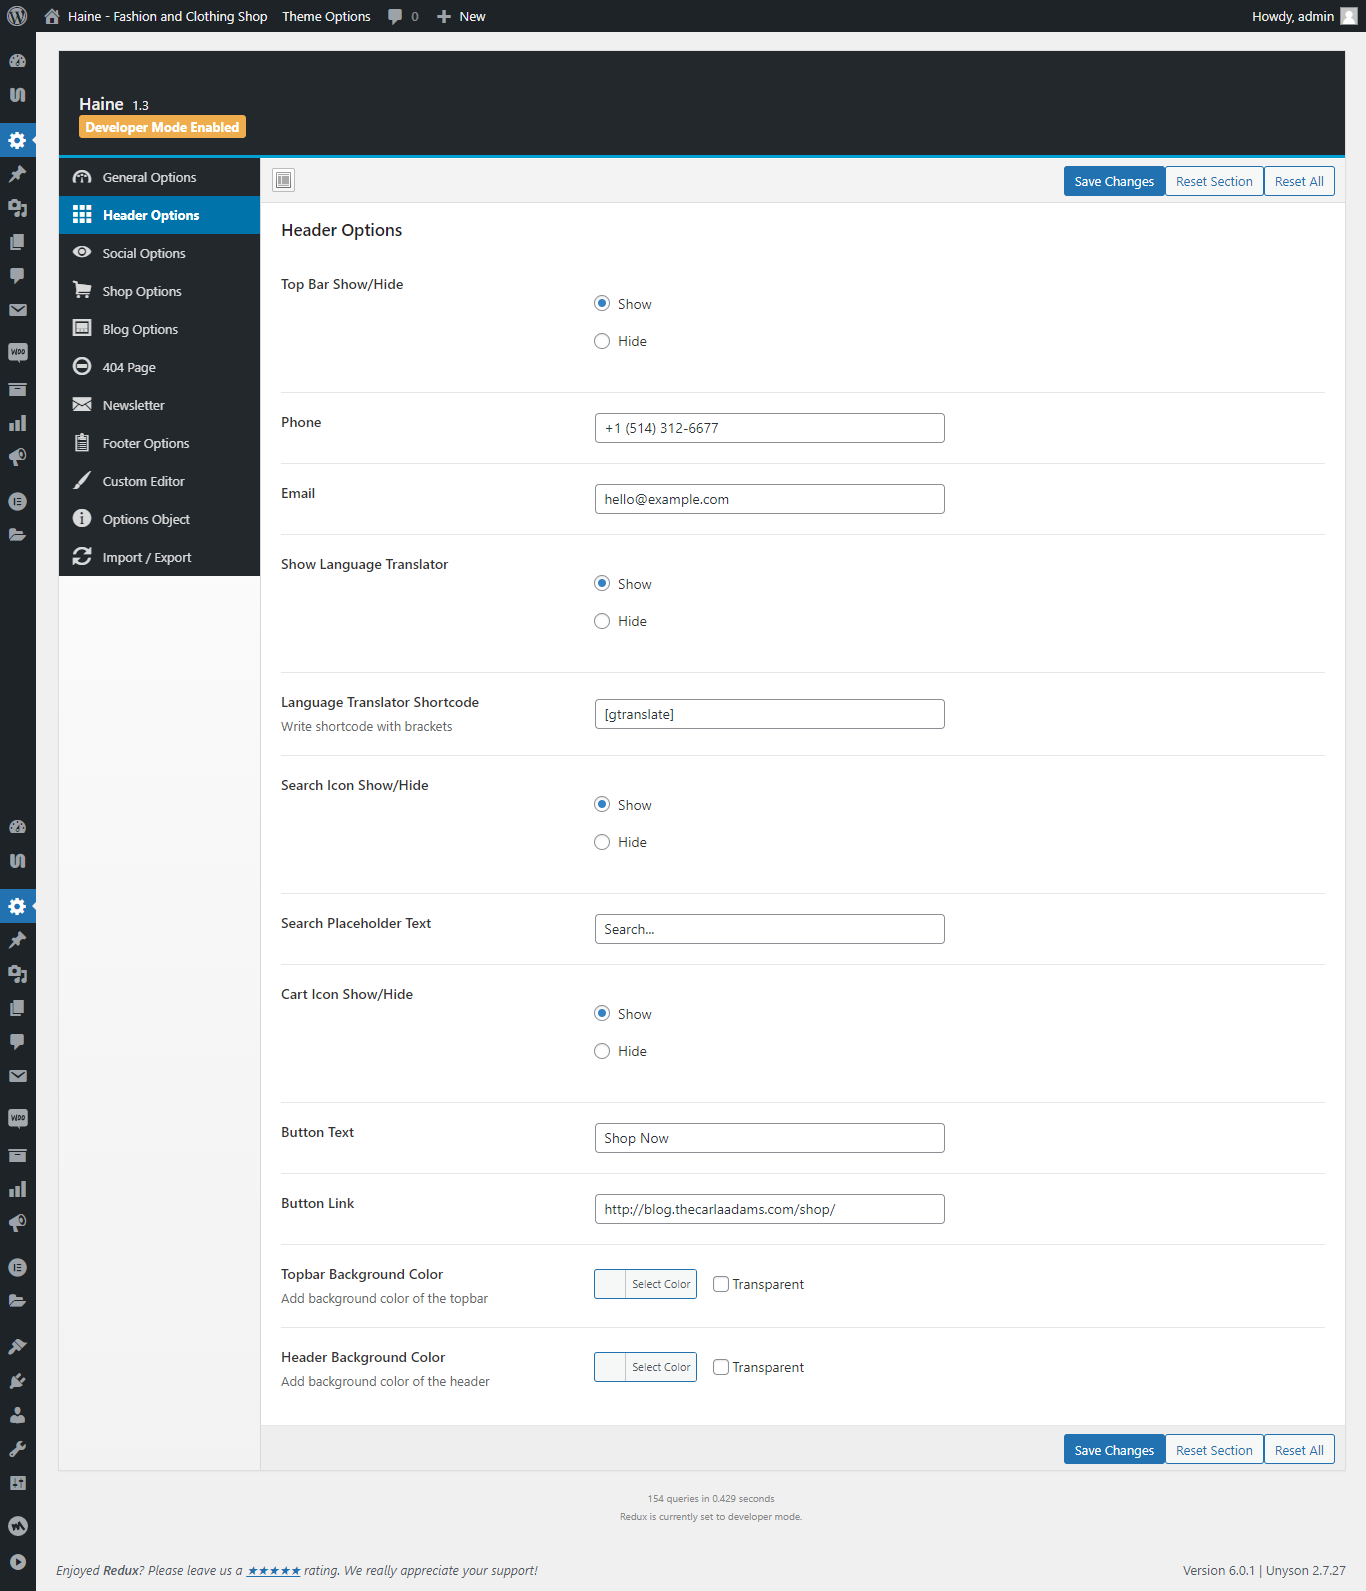
# Header Options:
1. Top Bar Show/Hide
2. Phone
3. Email
4. Show Language Translator
5. Language Translator Shortcode
6. Search Icon Show/Hide
7. Search Placeholder Text
8. Cart Icon Show/Hide
9. Button Text
10. Button Link
11. Topbar Background Color
12. Header Background Color
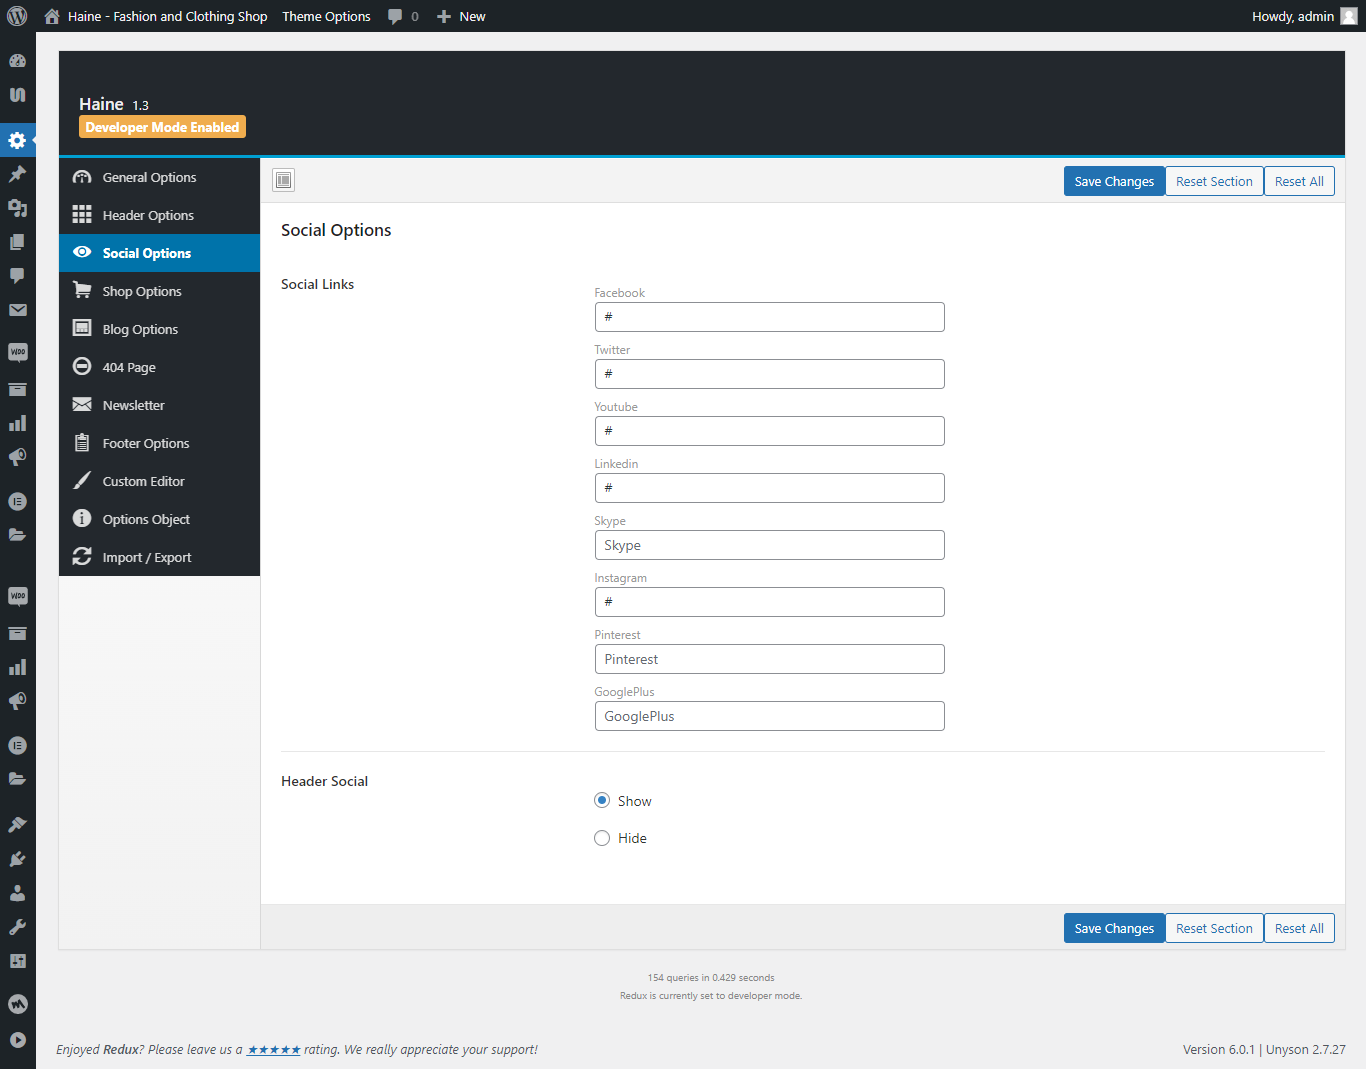
# Social Options:
1. Social Links
2. Header Social
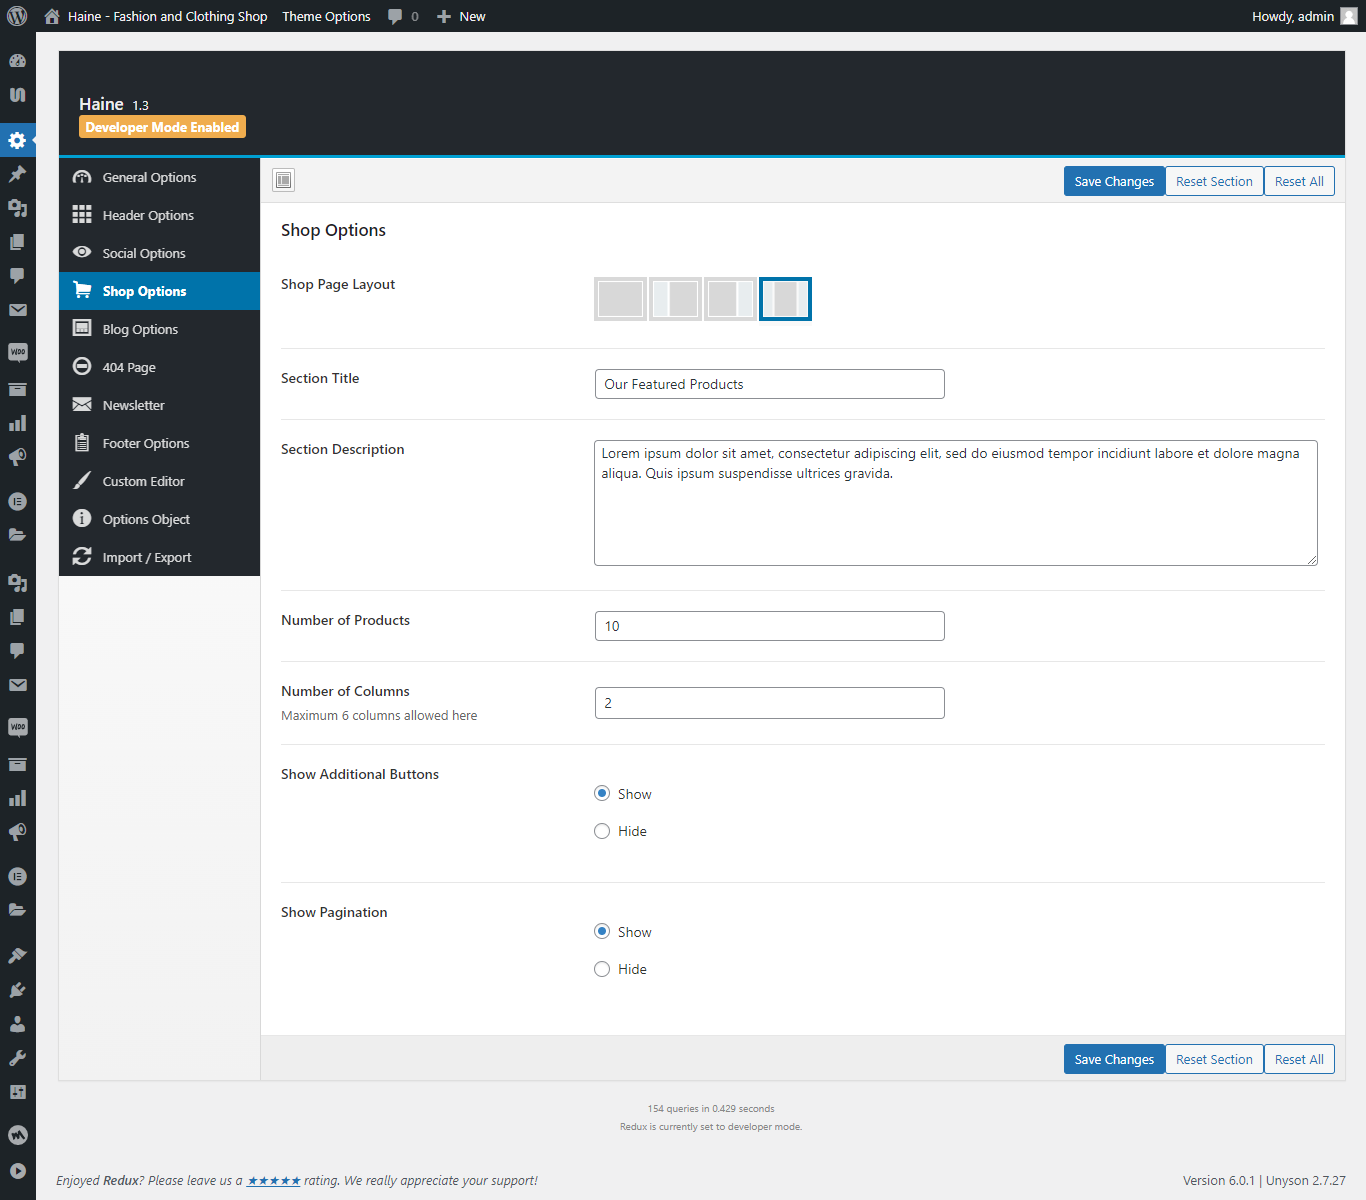
# Shop Options:
1. Shop Page Layout
2. Section Title
3. Section Description
4. Number of Products
5. Number of Columns
6. Show Additional Buttons
7. Show Pagination
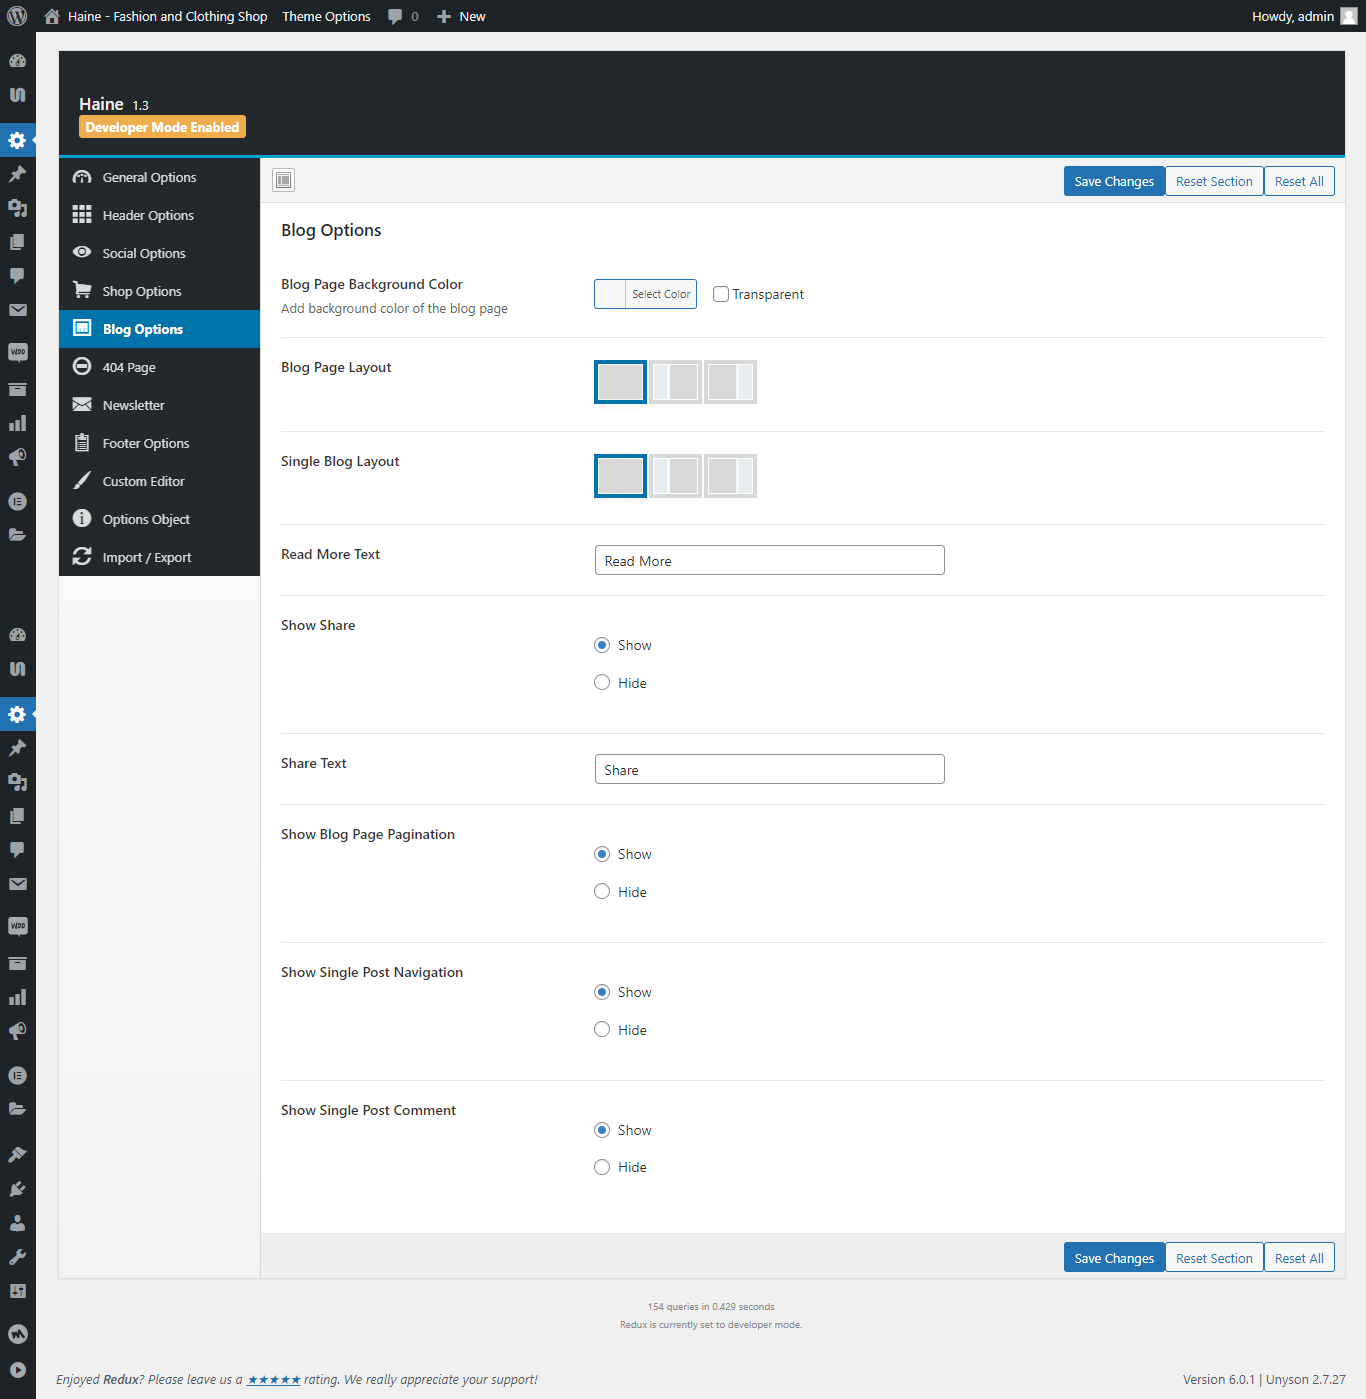
# Blog Options:
1. Blog Page Background Color
2. Blog Page Layout
3. Single Blog Layout
4. Read More Text
5. Show Share
6. Share Text
7. Show Blog Page Pagination
8. Show Single Post Navigation
9. Show Single Post Comment
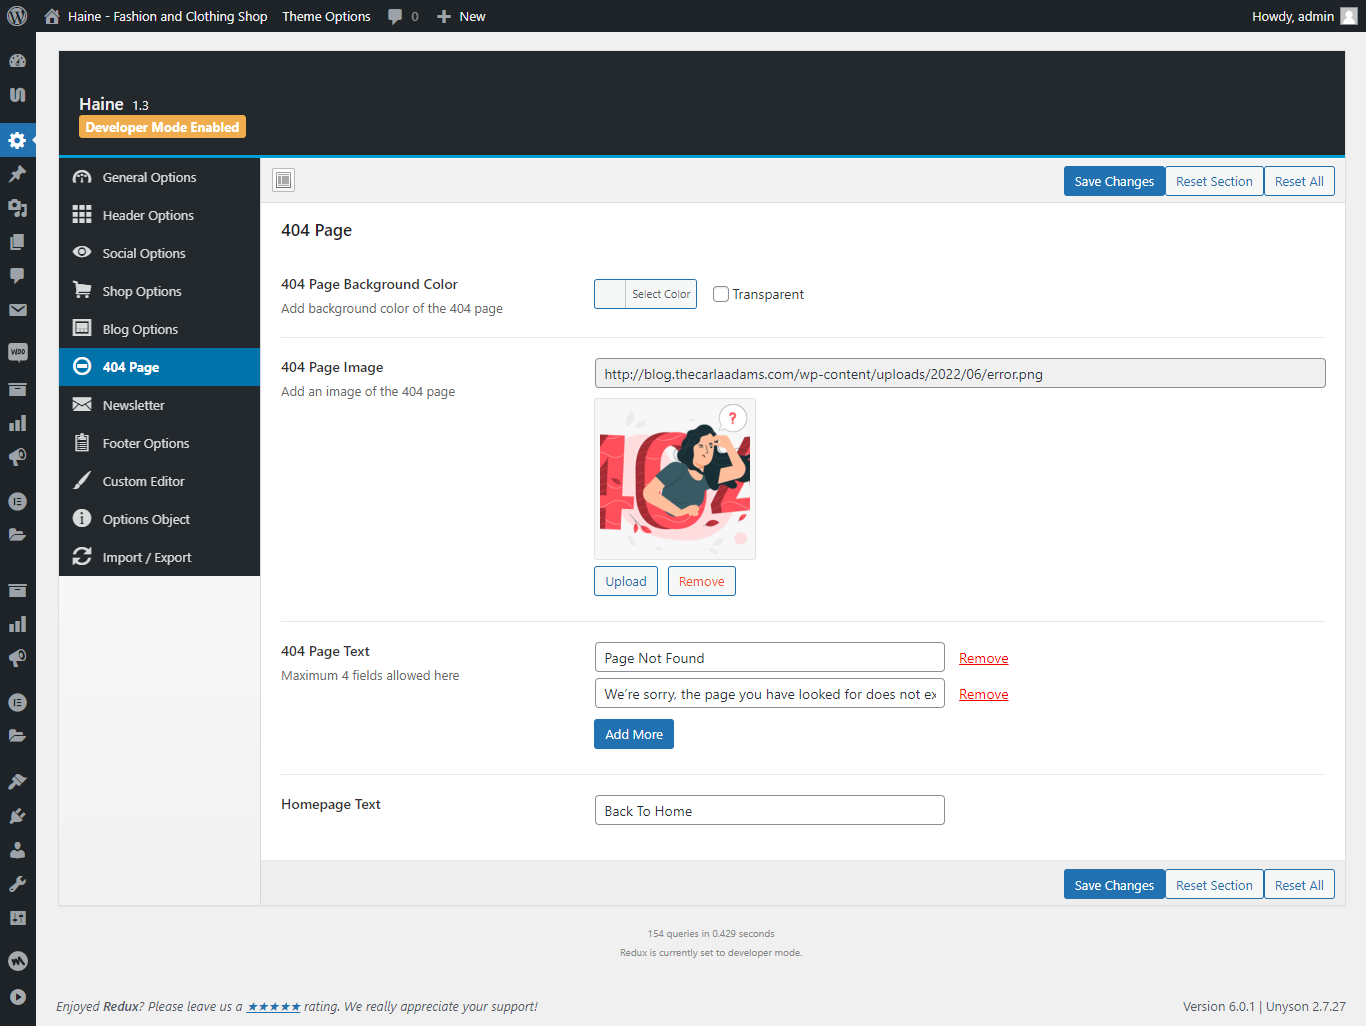
# 404 Page:
1. 404 Page Background Color
2. 404 Page Image
3. 404 Page Text
4. Homepage Text
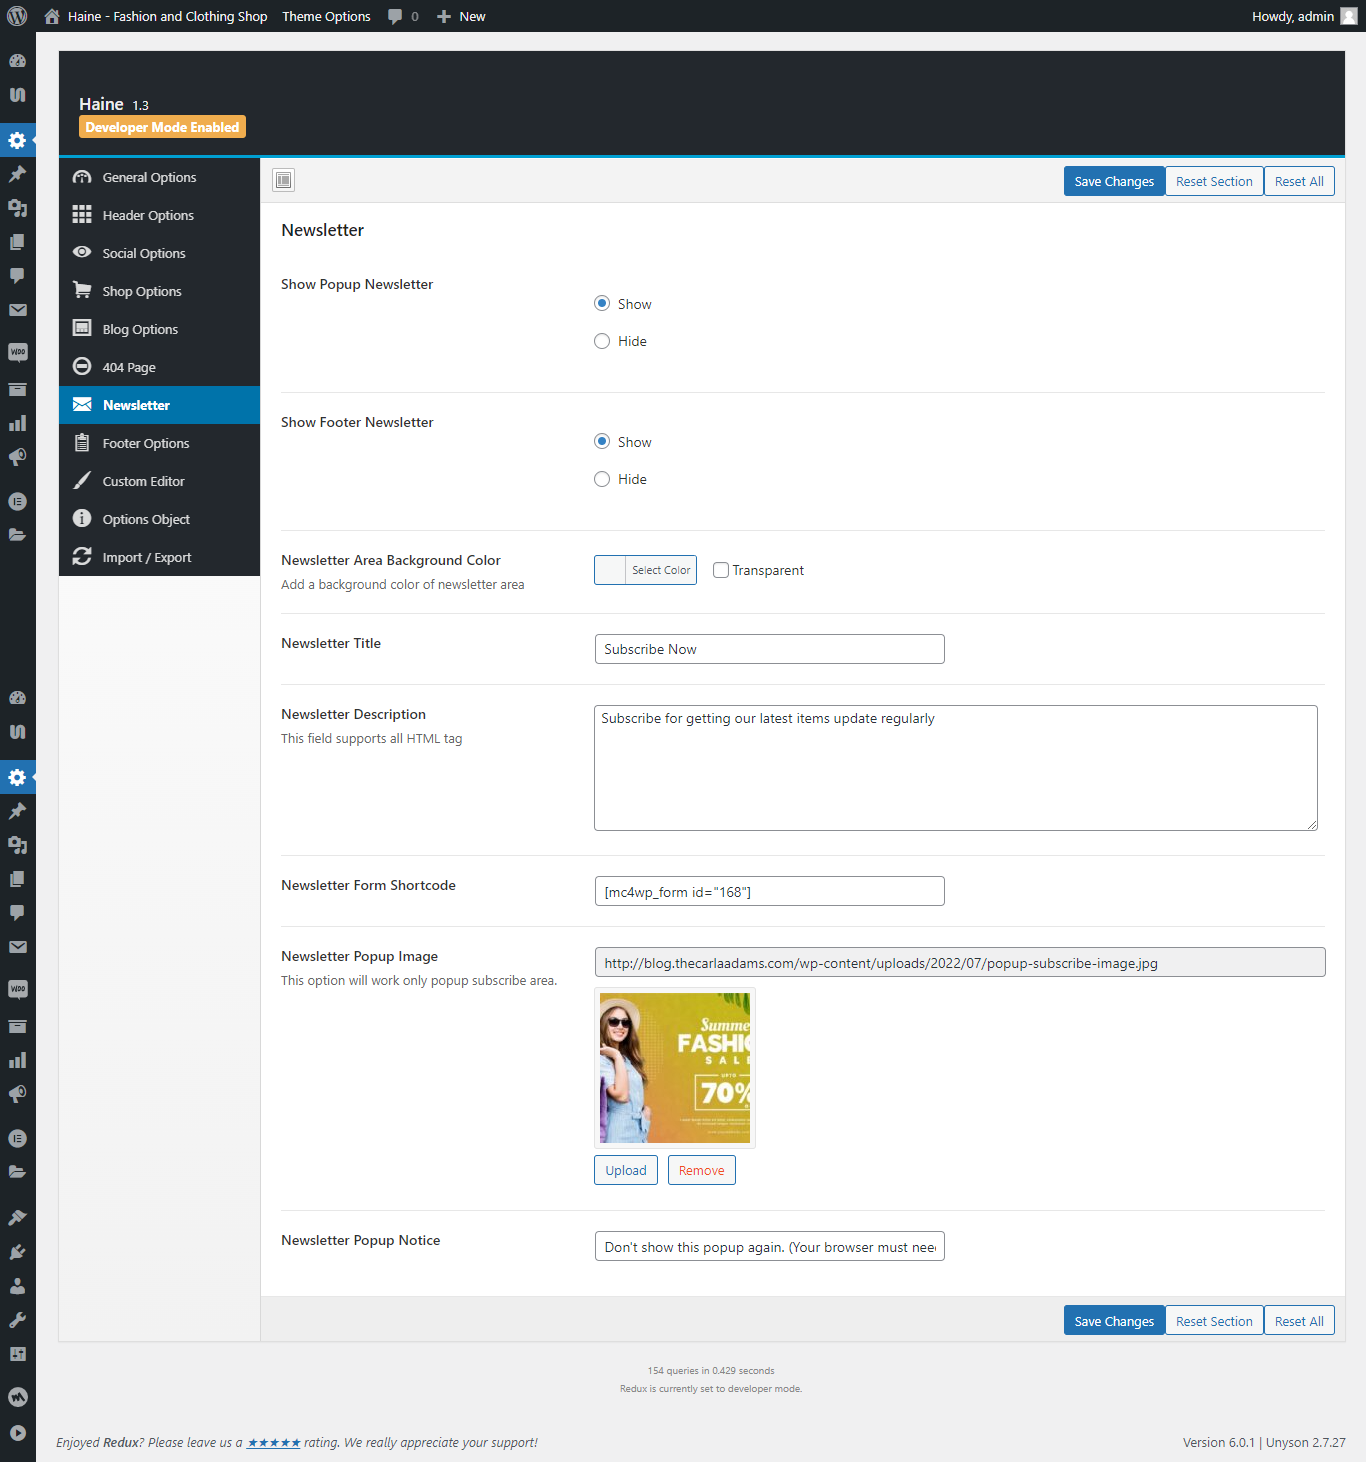
# Newsletter:
1. Show Popup Newsletter
2. Show Footer Newsletter
3. Newsletter Area Background Color
4. Newsletter Title
5. Newsletter Description
6. Newsletter Form Shortcode
7. Newsletter Popup Image
8. Newsletter Popup Notice
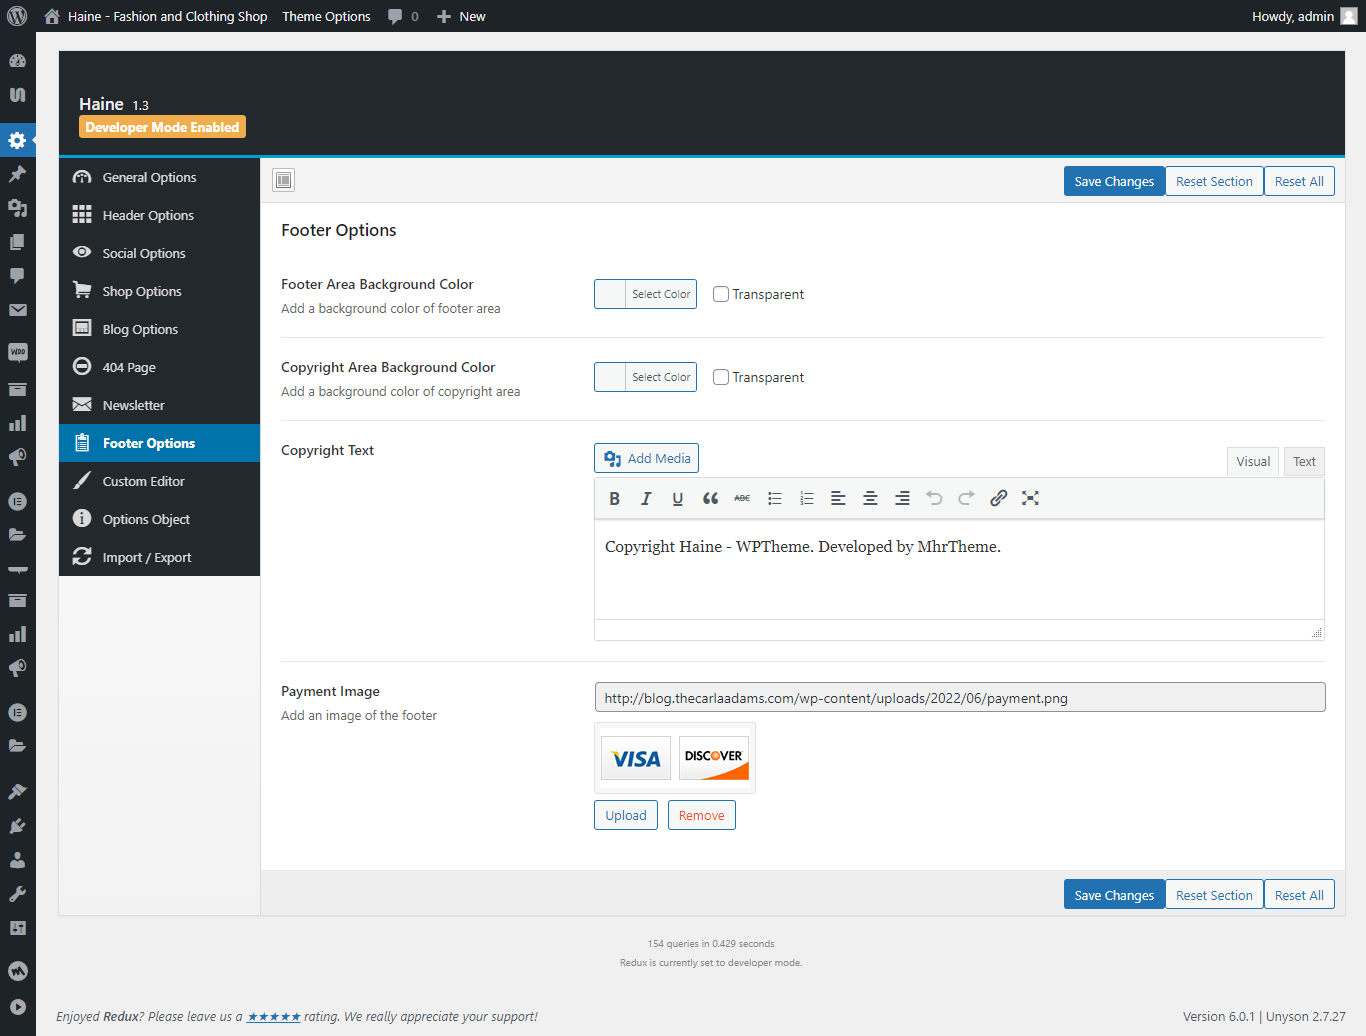
# Footer Options:
1. Footer Area Background Color
2. Copyright Area Background Color
3. Copyright Text
4. Payment Image
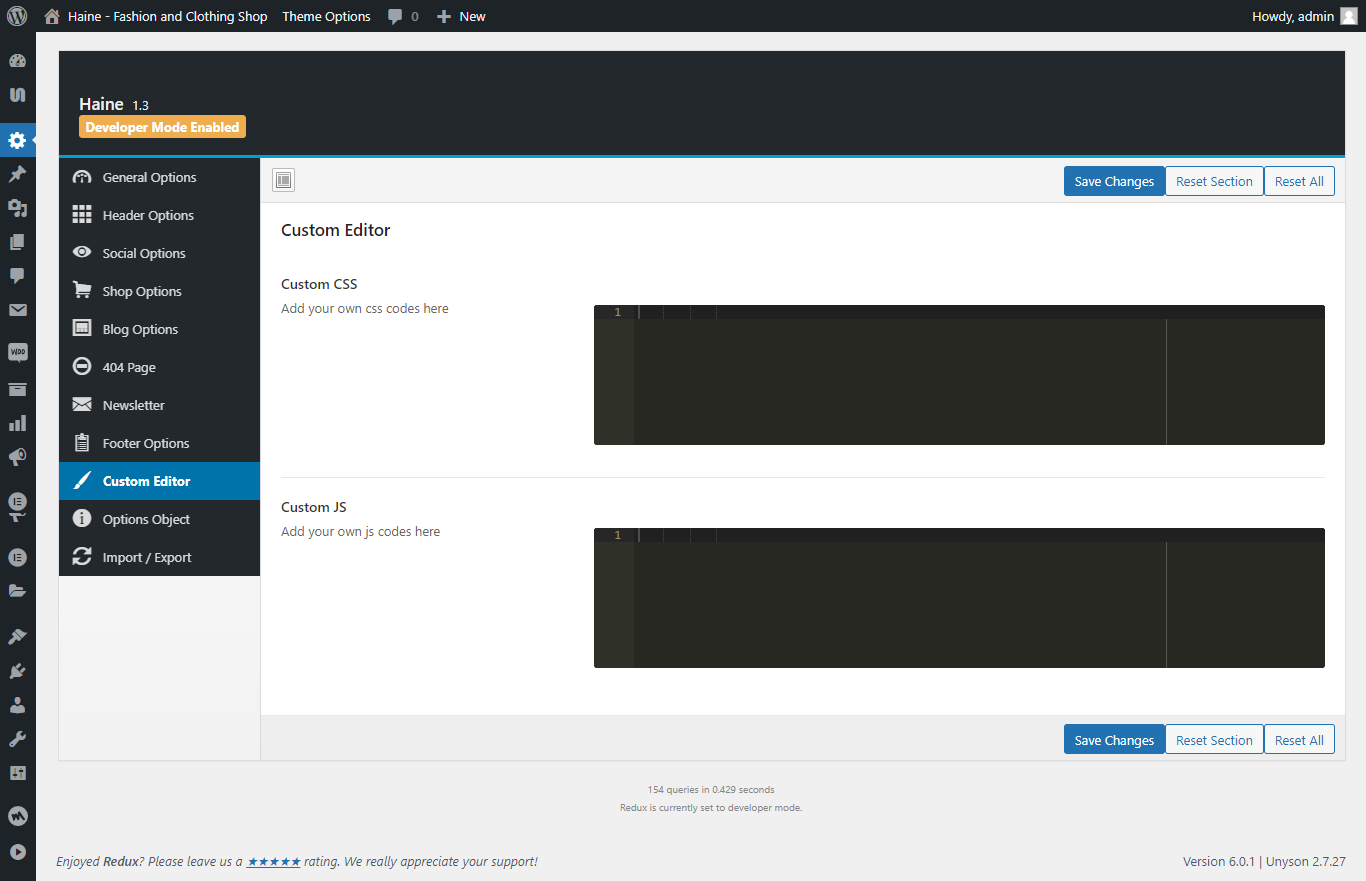
# Custom Editor:
1. Custom CSS
2. Custom JS
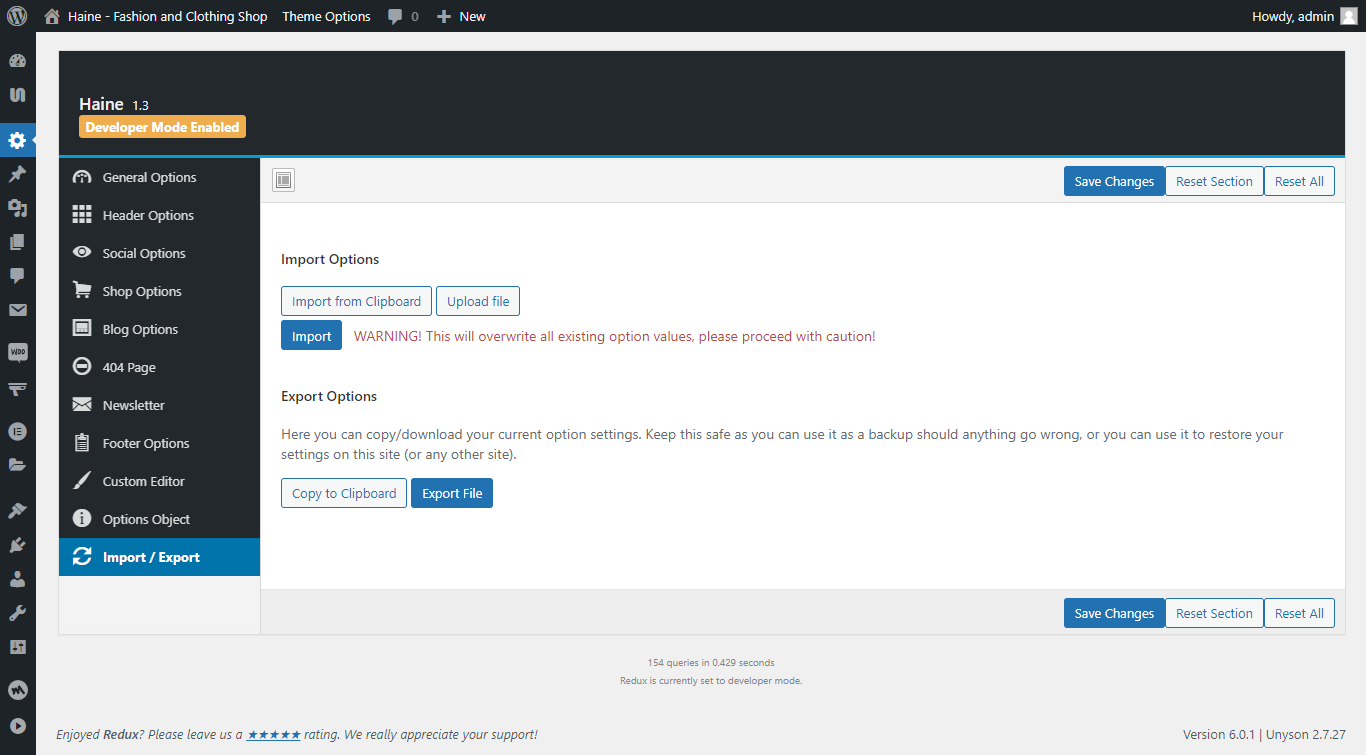
# Import / Export:
1. Import Options
2. Export Options
Theme Elementor Widgets
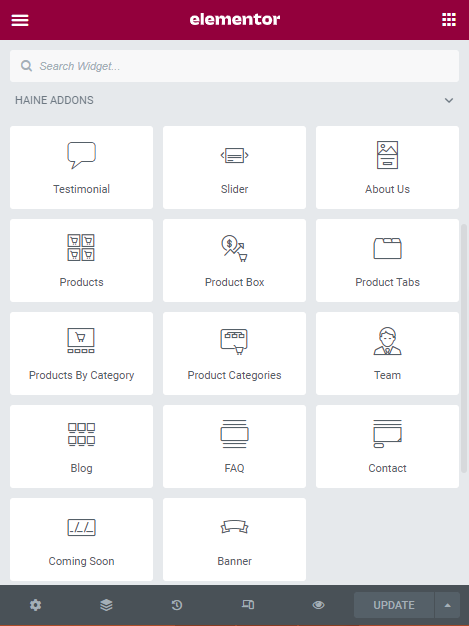
Haine theme supports elementor website builder plugin that helps you create visual template pages. There are 14 custom elementor widgets that can make dynamic page content.
- Testimonial
- Slider
- About Us
- Products
- Product Box
- Product Tabs
- Products By Category
- Product Categories
- Team
- Blog
- FAQ
- Contact
- Coming Soon
- Banner
Source and Credits
I would like to thank the following providers. This theme would not have been possible without the hard work and dedication of all of them.
- WP Plugin - Elementor Website Builder
- WP Plugin - WooCommerce
- WP Plugin - Buy Now Button for WooCommerce
- WP Plugin - Unyson
- WP Plugin - Contact Form 7
- WP Plugin - Mailchimp for WordPress
- WP Plugin - Redux Framework
- WP Plugin - GTranslate
- Frontend Framework - Bootstrap 4
- JavaScript Library - jQuery
- Theme Custom Styles and Scripts
Support
If you face any problems with the installation or customization of our product please do not hesitate to contact us via Ticket on Marketplace.
We have done a ton of work to make our template very easy in configuration, updating, and customization, please rate it with a high Star if possible (on the downloads page). A good mark will be appreciated.
Thank you.
Wish you success.